
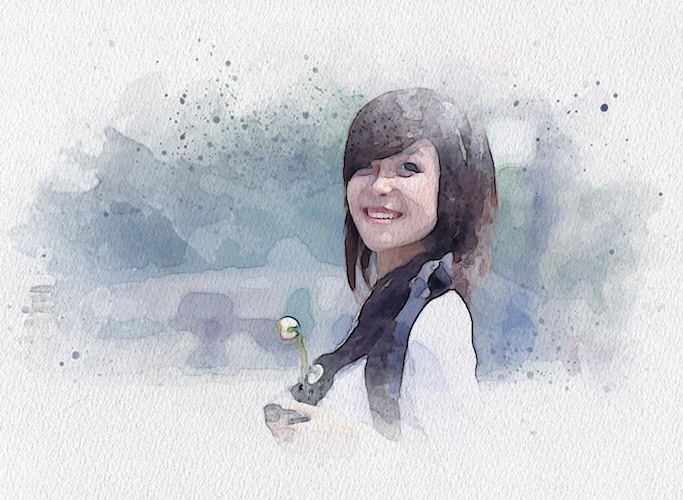
Turning an ordinary photo into a beautiful watercolor painting is a great way to give your images a creative and artistic look. With Photoshop, you can recreate the soft colors, textured brush strokes, and blended edges found in traditional watercolor artwork. The best part is that you don’t need professional painting skills to get started. By using Adobe Photoshop, you can easily turn your simple image into mind-blowing watercolor artwork with just a few simple steps. In this guide, we’ll provide step-by-step instructions on how to create a watercolor effect in Photoshop.
Part 1: What is a Watercolor Effect?

Most of us have done a watercolor painting at some point in our lives. A PS watercolor effect is a digital editing technique that transforms a regular photo into artwork that looks like it was painted using watercolor paints. It features soft colors, blended edges, subtle brush strokes, and a textured appearance that resembles watercolor paper. This effect can give ordinary photographs a creative and artistic feel without requiring traditional painting skills. With tools like Adobe Photoshop, you can apply watercolor effects to different types of images, including portraits, landscapes, pets, buildings, and more.
Part 2: What You Need to Create a Watercolor Effect in Photoshop
Before creating a watercolor filter in Photoshop, you’ll need a few basic things to get started. Fortunately, you don’t need professional design experience or expensive equipment. Here’s what you need:
- If you want to create a high-quality watercolor effect, we recommend using the latest version of Adobe Photoshop with advanced tools.
- The next thing you must have is a clear, high-resolution image with good lighting. A low-quality image can ruin the final result.
- To create a watercolor effect in Photoshop, you need to download watercolor brushes that can add realistic brush strokes, splashes, and painted textures to your image.
- Basic Photoshop knowledge is essential because without understanding the basic editing tools, beginners may find it difficult to apply filters, use layer masks, and work with watercolor brushes.
Once you have all these things, you can begin transforming your ordinary photos into beautiful watercolor artwork with Adobe Photoshop.
Part 3: How to Create a Watercolor Effect in Photoshop: Step-by-Step
Watercolor is a special painting technique in which paints are applied to wet paper, creating blurred strokes and a lighter composition. You can achieve this not only with real paint but also in Photoshop. Here are step-by-step instructions on how to create watercolor effect in Photoshop:
Step 1: Convert The Layer to a Smart Object
Launch the latest version of Adobe Photoshop on your PC and open the image you want to transform into a watercolor painting. Once the image is uploaded, duplicate the layer. To do this, use “Ctrl + J” or “Command + J.” Duplicating the layer allows you to keep the original image untouched while applying the watercolor effect to the copy. Next, right-click on the layer and select the “Convert to Smart Object” option.
Step 2: Add The Dry Brush Filter
After converting the duplicated layer into a Smart Object, the next step is to add a Dry Brush filter. This filter helps create the rough, painted texture that is commonly seen in watercolor artwork. To apply it, go to Filter > Filter Gallery from the top menu and select the Dry Brush option from the available artistic filters.
Step 3: Adding a Cutout Filter
Return to the “Filter Gallery” and choose “Cutout” from the “Artistic Folder.” Then set the edge fidelity to 1, the edge simplicity to 1, and the number of levels to 8. Click the “OK” button to save the changes.
Now, double-click the small icon next to the top Filter Gallery filter under Smart Filters in the Layers panel. This will open the Blending Options for that filter.
Change the Blend mode to Pin Light and click on the “OK” option.
Step 4: Blur The Image
Next, you’ll need to create a blur effect. To create a blur effect, simply go to Filter > Blur > Smart Blur. Once the Smart Blur dialog box appears, adjust the settings according to your image. You can set the radius to 100, threshold to 100.0, quality to High, and mode to Normal.
Now, double-click the small icon next to the Smart Blur filter under Smart Filters in the Layers panel. This will open the Blending Options, where you can adjust how the Smart Blur effect blends with the image.
Change the Blend Mode to Screen and the Opacity to 50%, and click “OK.”
Step 5: Apply the Find Edges Filter
The final filter is called Find Edges, which will mimic pencil traces that show through the watercolor. To apply it, go to Filter > Stylize > Find Edges.
Double-click the small icon to the right of the Find Edges filter in the Smart Filters in the Layers panel. This opens the Blending Options for that effect.
Turn the Blend mode to Multiply and the Opacity to 80%, and click OK.
Step 6: Add a Paper Texture
Now, you’ll need to add a paper texture to make your watercolor effect more realistic. You can apply paper overlay by choosing File > Place > Embedded. Next, move the texture layer above the editing image in the Layers panel. You can then change the layer’s Blending Mode option to “Multiply.”
Step 7: Paint on The Image
Select the watercolor image layer and add a black layer mask using the “Add Layer Mask” button. Press Ctrl/Cmd + I to invert the mask. Select the Brush Tool and choose a downloaded watercolor brush. Paint with white on the mask to reveal the image. Make sure that the brush is set to a larger size.
You have successfully created a beautiful watercolor effect in Photoshop. Once you are satisfied with the result, save the project as a PSD file if you want to edit it later, or export it as a JPG or PNG.
Bonus Tip: Use Edimakor AI to Create Watercolor Effects in a Smarter Way
By following the above step-by-step instructions, you can easily create watercolor effect in Photoshop. However, the process can be time-consuming and requires basic knowledge of Adobe Photoshop. If you are looking for a quicker and simpler way to transform your photos, Edimakor AI can make the process easier. It is an AI-powered editing tool that enables users to transform images into various styles with a single click, including watercolor. Edimakor AI’s image-to-image feature can transform your ordinary image into a realistic watercolor effect with a simple text prompt — no editing experience or professional help required. The best part of this tool is that it offers an easy-to-use interface, which is ideal for non-tech and beginner users. Plus, it supports a wide range of AI image styles, such as watercolor, realistic, 3D, anime, cartoon, cyberpunk, and more.
Create NowKey Features of Edimakor AI
- Image-to-Image: Edimakor AI offers an advanced image-to-image feature that allows users to turn simple images into various styles with a single click, including watercolor, realistic, 3D, anime, cartoon, cyberpunk, oil painting, and more.
- Text-to-Image: The program also offers text-to-image capabilities, allowing users to create engaging and high-quality visuals with a simple text prompt — no editing experience or professional help required.
- Advanced AI Models: This tool includes a wide range of AI models, each with unique features and capabilities. Available models are Nano Banana, Nano Banana Pro, Flux, Midjourney, Stable Diffusion, Seedream, and Imagen 4.
- Customization Options: With the help of this tool, users can adjust AI images and videos according to their requirements. Users can change the image background, add effects, filters, text, music, and much more.
- Intuitive Interface: Unlike Adobe Photoshop, Edimakor AI offers an easy-to-use interface, which is ideal for non-tech and beginner users. Simply upload the image, enter the prompt, and click on the “Generate” button.
Step-by-Step Guide:
If you want to convert ordinary images into a realistic watercolor effect with Edimakor AI, follow the instructions below:
Step 1: Open your web browser and go to the Edimakor AI official site. Log in with your account and select the “Image-to-Image” feature. Choose the AI model and upload the image you want to transform.
Step 2: Enter the text prompt in the prompt box and select the image settings, such as aspect ratio, output numbers, and resolution. Click the “Generate” button to begin the process.
Step 3: Select the “My Creation” option from the left panel and select the AI-generated image. If satisfied with the result, download the image in the desired format, such as JPG or PNG.
Final Thoughts
Creating a watercolor effect in Photoshop is a great way to transform ordinary photos into creative, hand-painted artwork. However, the manual process can take some time, especially for beginners. If you want a quicker approach, Edimakor AI provides AI-powered tools that can help you experiment with watercolor-style effects using simple prompts and fewer editing steps.


Leave a Comment
Create your review for HitPaw articles