Want to create a reverse video effect that grabs attention? Kapwing makes it easy to reverse footage and create fun effects, be it playful rewinds or dramatic edits. But before you dive in, you’re probably wondering: how does it actually work, and is it worth your time?
This guide shares how to use the Kapwing reverse video feature step by step. You’ll also find expert tips to elevate your edits and pros and cons, so you can know if it meets your needs!
Part 1. How to Reverse a Video on Kapwing
Kapwing is an online video editor that works directly in your browser. One of its standout tools is the reverse video feature. This tool lets you play a video backward in a few clicks. You only need to apply the reverse toggle to the chosen clip. Then, you can preview the result instantly.
In addition, Kapwing lets you adjust export settings. This way, your reversed video comes out in the right format and quality. Besides this, it’s a complete editing solution. You can trim, crop, resize, and apply effects. You can even generate AI voices, subtitles, and more.
Steps to Reverse Video in Kapwing
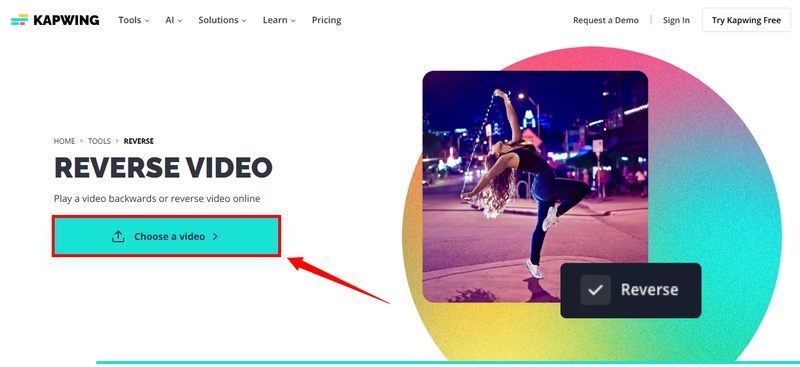
Step 1: Go to Kapwing’s official website using your browser. Then, click “Choose a video” to get started.
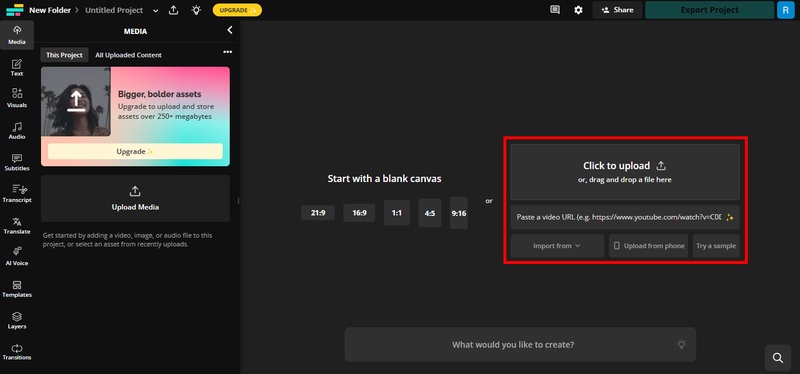
Step 2: You will be directed to Kapwing’s editing interface. From here, press “Click to Upload” to import your video.
- Alternatively, paste the video URL if it’s available online.
-
You can also input files from Google Drive or Vimeo and from mobile.

Step 3: After uploading your file, you can start editing it. Select the clip in the timeline. You’ll see an editing panel on the right. Scroll down in here. Then, turn on the toggle for “Reverse video.”
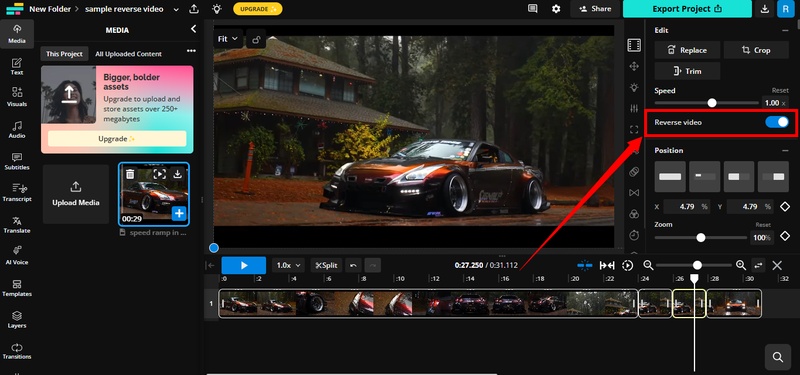
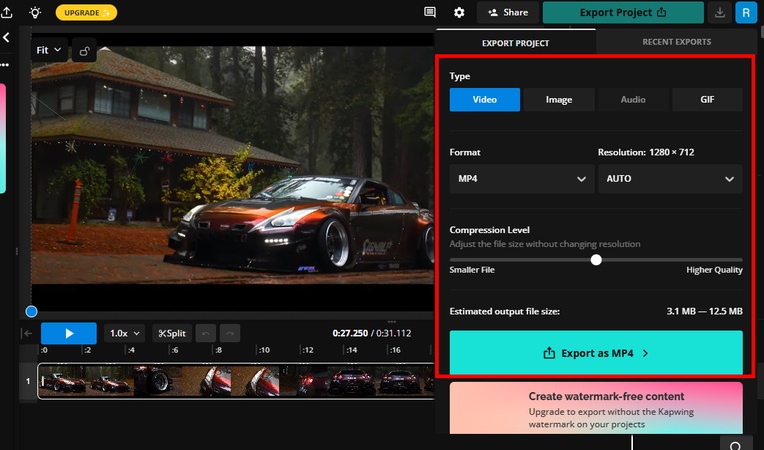
Step 4: Your video will play backwards now. Click the “Play” button to preview it. Then, click the “Export Project” button in the top right.
Step 5: Adjust settings to export the video. These include format, resolution, and compression level. Then, click “Export as MP4” to store the video on your device.
Part 2. Pro Tips to Use Kapwing Reverse Video
Simply flipping a clip backward is only half the equation. To create realistic results, you need to enhance it with additional edits. Here are some pro tips to get the most out of Kapwing’s reverse feature.
1 Split and Duplicate
Start by splitting your original video into sections. Select the portion you want to reverse and duplicate it. Then duplicate the clip that comes before it. Place this copy directly after the reversed section. This creates a natural “rewind” effect, as if the video is being pulled back in time.
2 Speed it Up
A true rewind looks faster than normal playback. Increase playback by 2x or 4x to copy that effect. This trick also highlights actions like a dance move, a sudden fall, or a sports trick. Reverse and speed it up to bring out the energy in those moments.
3 Enhance with Effects
Layer your reverse clip with filters and transitions for added drama. Use cinematic color filters like Sepia for a vintage look. Otherwise, pick Hockaday for a modern setting. Apart from this, you can add glitch effects to make the reversal feel intentional.
4 Use Graphic Elements
Visual cues help the viewer follow the story. Arrows, clocks, or looping icons show that time is going backward. For comedy edits, you can try fun stickers or animated graphics to give the video more personality.
5 Add Sound Effects
Sound makes the effect complete. Add rewind noises, tape-deck screeches, or whooshing sounds to match the visuals. For action edits, use fast beats or glitchy effects. You can also go for soft instrumentals to set an artistic mood.
Part 3. Pros and Cons of Kapwing Reverse Video
Before you create a reverse video in Kapwing, you should know if it fits your needs. Below, we'll weigh its pros and cons so you can make a smart decision.
Pros
- The reverse function is easy to apply without complex settings.
- Works entirely in your browser, so you don’t need to download or install anything.
- Upload videos in multiple ways, like from a device, URL, and cloud.
- Offers additional tools to fine-tune the revered video for realistic results.
- Allows real-time collaboration, so many users can edit the same project.
Cons
- The free version places a watermark and restricts exports to 720p.
- Requires a stable internet, which can be limiting for those with slow access.
- Longer videos and high-resolution files take more time to process and export.
- It lacks the deep controls offered by professional desktop editors.
- Editing can be sluggish on lower-spec devices, as all processing occurs online.
Part 4. Best Alternative to Reverse Video
The Kapwing reverse video tool may be convenient. But it has some limitations. For starters, you need a strong internet connection. Otherwise, larger videos or complex edits can take more time to process. Moreover, all its editing tools are condensed in one editing panel. So, you'll have to dig through the entire menu to find a specific tool you need.
That's where Hitpaw Edimakor can help you. It is a desktop editor for Windows and Mac with professional tools to enhance your reversed clips. You can adjust the speed and keep the original pitch of the audio. This ensures the sound remains natural when editing. Edimakor also lets you enhance videos with filters, effects, graphics, and more. Its AI-powered tools simplify editing tasks. So, you can finish projects faster.
Key Features of Edimakor's Free Video Reverser
- Reverse any Video: Edimakor supports almost all video file formats and can get video reversed in 1 click.
- High-Quality Video: It reverses your video without compromising your video quality and can enhance it to 4K.
- Flexible Audio Control: Support reversing audio while reversing video and maintain audio quality.
- Complete Editing Tools: You can use basic tools like trim, split, rotate, or crop. Or, create advanced effects with speed ramps, masking, keyframing, and more.
- Social Media Export: Export videos suitable for social platforms like TikTok, Instagram, or YouTube. Keep your clips ready to post and share instantly!
How to reverse video with Edimakor:
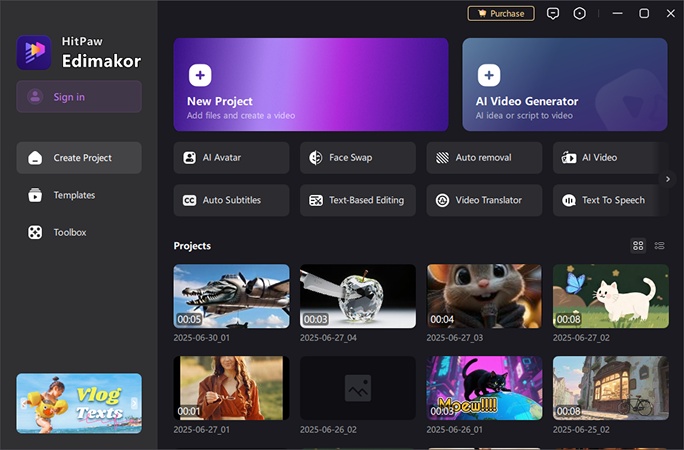
Step 1: Download, install and open Edimakor on your Windows and Mac computer. Click New Peoject and upload your video.
Step 2: Drag the video to the timeline and click the Reverse icon. Your video will be reversed soon.

Conclusion
That’s all about using the Kapwing reverse video tool. Using this tool, you can flip clips backward in seconds. And if you want to get creative, you can further enhance the clip for sleeker results. However, it relies heavily on a strong internet. Plus, it has limited advanced features.
If you’re seeking more control, Edimakor can be your go-to. It offers desktop editing tools with built-in AI capabilities. It’s also super easy to work with. So, don’t wait. Download it now to get started!
Leave a Comment
Create your review for HitPaw articles

