One of the greatest methods to share memories, advertise material, or just go viral on social media is via reels. You may create visually striking reels in a matter of minutes by artistically fusing images and music. Even if you have never edited before, this guide on how to make a reel with photos demonstrates how to do it quickly.
Part 1: What You Need to Know Before Making a Reel
It is crucial to comprehend the reasons behind the popularity of photo-based reels before you start learning how to make a reel with photos on Instagram. Here are some tips to help your content perform well and stand out.
1 Benefits to Make a Reel with Photos?
Before heading towards how to make a reel with multiple photos, let us see the reasons for making a reel with photos:
Easy and Fast Content Production
You can save time and work by turning your current images into captivating reels instead of having to create brand-new video content.
Increase Participation
Reels are preferred by Instagram's algorithm, and photo-based reels frequently get more views and interaction than static posts in the feed.
Describe Visual Tales
A series of carefully chosen images may tell a whole story; they are ideal for events, makeovers, or portfolio displays.
Additional Editing Control
You have more control over the pace, filters, and transitions when using photographs, which makes it easier to constantly uphold your brand's design.
2 Key Elements of a Good Photo Reel
These key elements of a good photo reel are essential to understand before learning how to make a reel with photos and music:
Excellent and Consistent Pictures
Make use of crisp, well-lit images that complement the tone and theme of your reel. Steer clear of hazy or inconsistent images.
Enthralling Voiceover or Music
Your reel will sound better with the correct audio; use AI tools to upload custom voiceovers or select popular noises.
Easy Transitions
To maintain viewers' interest and ensure a smooth flow, use modest yet effective transitions between images.
Captions or Text on the Screen
Particularly for viewers who are sound-off, include succinct, snappy text or subtitles to direct the audience and emphasize your main point.

Part 2: How to Make a Reel With Photos and Music on Edimakor
Once you’ve decided to learn how to make a reel on computer, start by picking a viral reel topic as inspiration. This gives your content a trendy edge and improves your chances of going viral.
1 Make a Reel With Photos and Music | Step by Step
Now that you know why picture reels are popular, let us have a look at a quick and imaginative way to learn how to make a reel with a bunch of photos using Edimakor's easy-to-use tools.
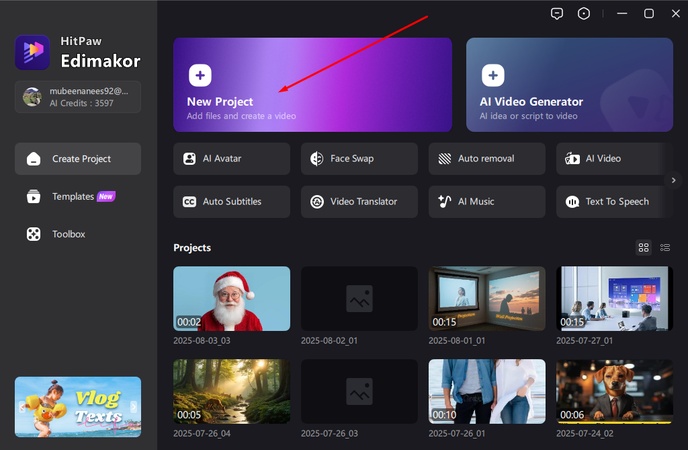
Step 1: Open Edimakor and Start a New Project
Launch HitPaw Edimakor and click on New Project. Choose the 9:16 vertical format for Instagram reels.
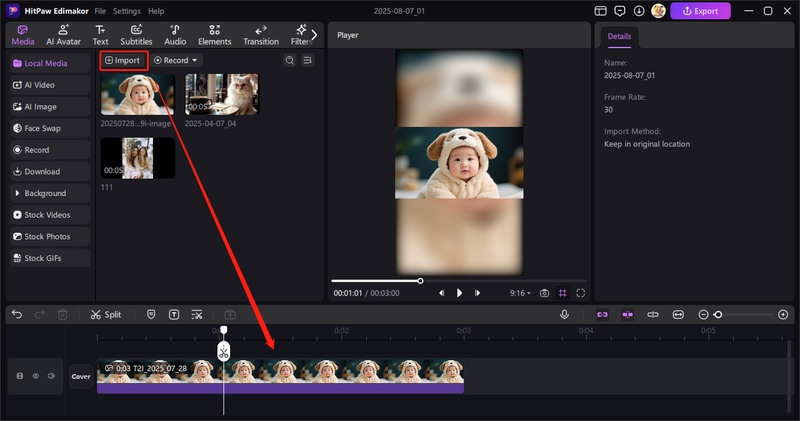
Step 2: Upload Your Photos
To include every photograph in your reel, click the import button. Drag them sequentially to the timeline.
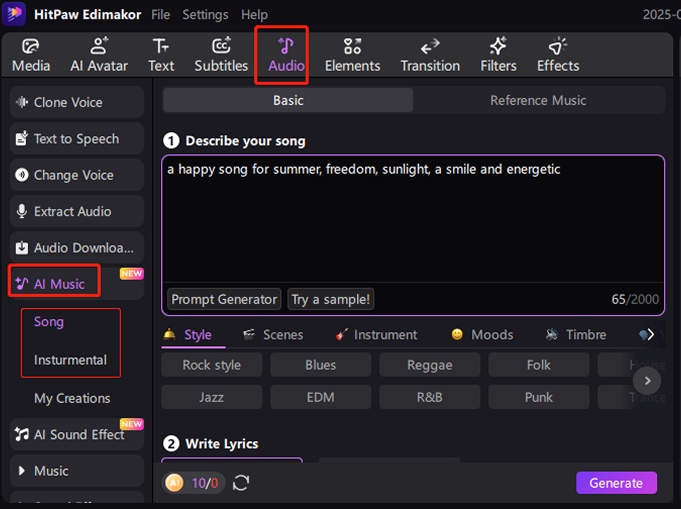
Step 3: Add Music
You can upload your own song, browse the built-in music, use text the speech feature, clone the voice, extract audio from a video or even download the audio using the link.

You can also use build-in AI music generator to custom your own music for the reel.
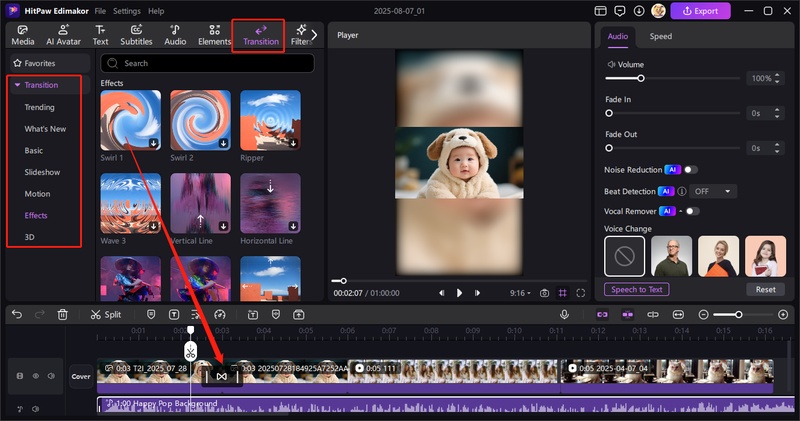
Step 4: Apply Transitions and Effects
Choose between-picture transitions such as swiping, zooming, or fading. For emotional intensity, use effects like gradual zoom-ins or filters.
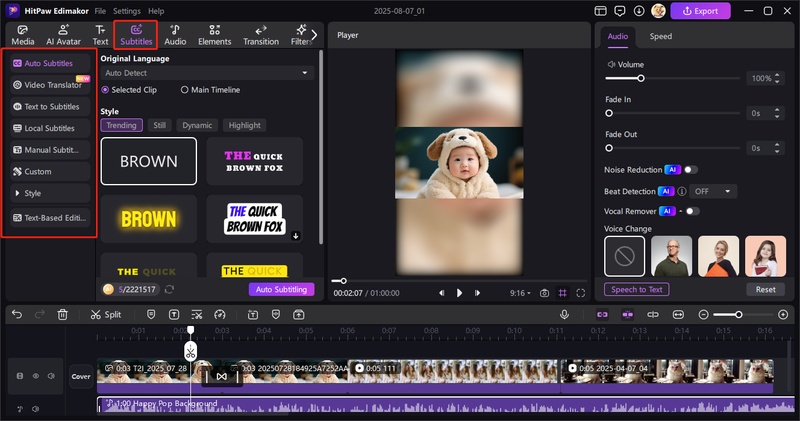
Step 5: Add Auto Subtitles and Text to Subtitles
You can also include turn text to speech and subtitles, and animated text overlays such as Then and Now. Also, add the subtitles manually or hit the Auto Subtitling option to add subtitles automatically.
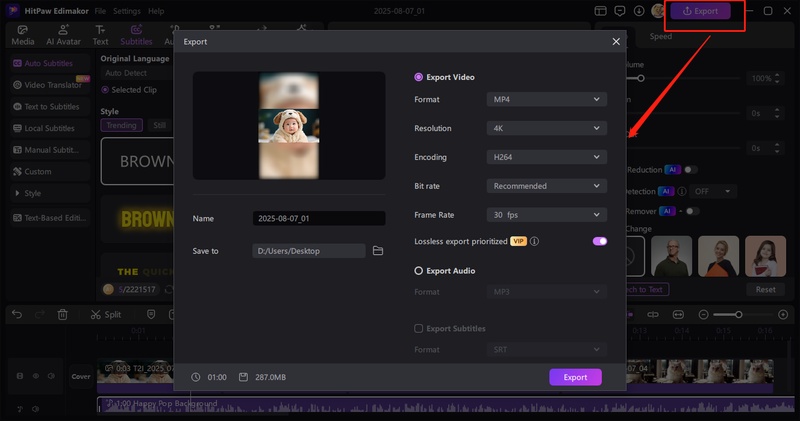
Step 6: Final Touch: Export
At last, hit the export button on the top right of scream. Select the format, resolution, bit rate, and frame rate of the video. Select Export Audio if u just want the audio and Export Subtitles if you're going to export the subtitle file along with the video or audio.
2 Tips for Making a Reel With Photos and Music
While learning how to make a reel with movie clip, make sure to get benefit from these tips:
Making Use of Effects and Transitions
To evoke strong feelings, use cinematic filters, subtle fades, and gentle zooms. The clip has a seamless, purposeful sense due to the regular transitions between each image.
Including Voiceovers or Soundbites
To make your reel more relatable and boost its likelihood of becoming viral, include soundbites, topical phrases, or personal voiceovers.
Telling Stories with Your Pictures
Photographs should be arranged narratively, beginning with the introduction, progressing through a trip, and concluding with a powerful statement. Use emoticons or text to help viewers navigate.
Part 3: How to Make a Reel With Photos and Music on Instagram
Here is a step-by-step guide on how to make a reel on computer Instagram:
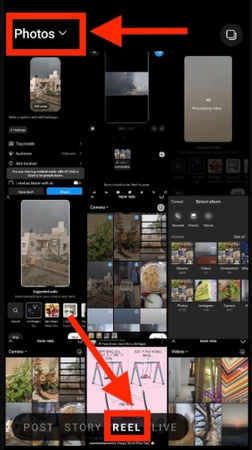
Step 1: Open Instagram and Start a New Reel
To start making your photo or video reel, open Instagram, hit the + sign, and choose Reel from the bottom bar.

Step 2: Choose Your Photos or Videos
Tap Next to proceed after selecting one or more images or videos from your gallery and adjusting each with sliders.
Step 3: Add More Clips or Edit Existing Ones
Tap Edit to shorten, rearrange, or change the duration of each clip, or tap Add clips to add more footage.
Step 4: Add Music and Effects
Tap the text icon to overlay messages or captions, the music icon to add sounds, the stars for effects, or the stickers for graphics.
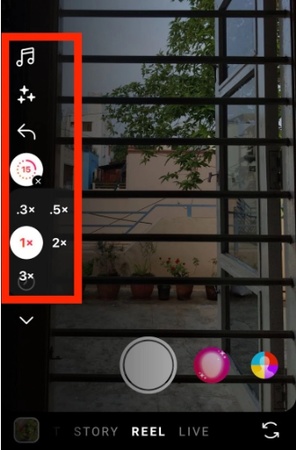
Step 5: Add Transitions and Clip Effects
To add transitions between clips, swipe up and tap the bar. Add effects, music, text, or amusing stickers to personalize each clip.
Step 6: Finalize and Share Your Reel
Click Next, select a cover photo, add a caption, tag individuals or items, save as a draft, or share right away.
Part 4: How to Make a Reel With Photos and Music on Facebook
Want to learn how to make a reel with photos and videos on iPhone? These are the steps to make a perfect reel on Facebook:
Step 1: Record or Choose Video Clips
To record a new video or upload from your smartphone gallery, launch the Facebook app, select Reels, and then select Create.

Step 2: Edit Your Facebook Reel
Utilize Facebook's editing tools to add text, add amusing stickers, add music, trim clips, and add visual appeal to your reel.
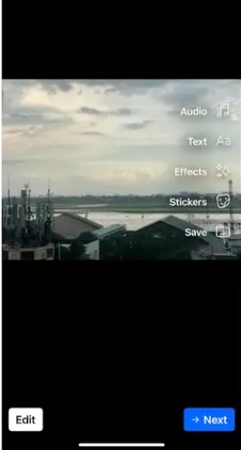
Step 3: Share Your Reel
Select Describe your reels to create an attention-grabbing caption. After that, click Share now to make your reel public quickly.
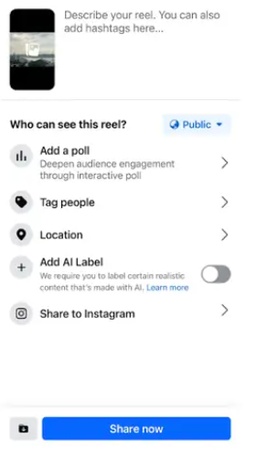
Part 5: How to Make a Reel With Photos on TikTok
Here are the steps to learn how to make a reel for business in no time:
1 Step 1: Start Your TikTok Reel
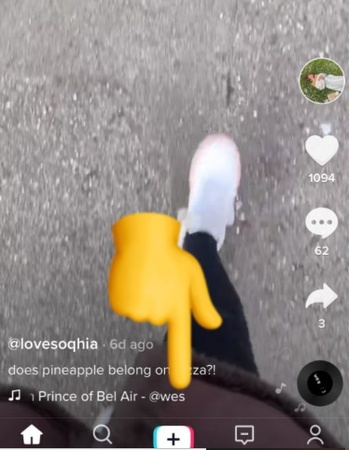
To begin making a new video, launch TikTok and hit the plus (+) symbol at the bottom of the screen.
2 Step 2: Upload or Capture Photos/Videos
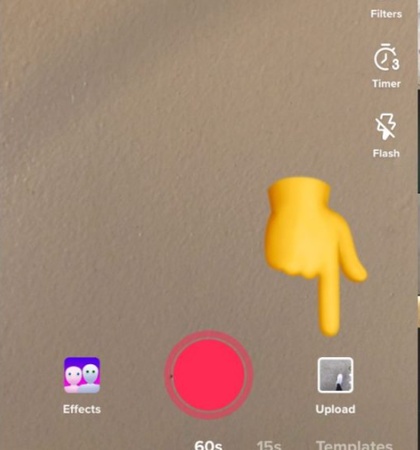
To upload images or videos from your collection, tap Upload. Alternatively, tap the center button to quickly record new video.
3 Step 3: Edit Your TikTok Video
Add stickers, text, music, and filters using TikTok's features. To increase interaction, be imaginative and improve your content.
4 Step 4: Tap Next to Continue
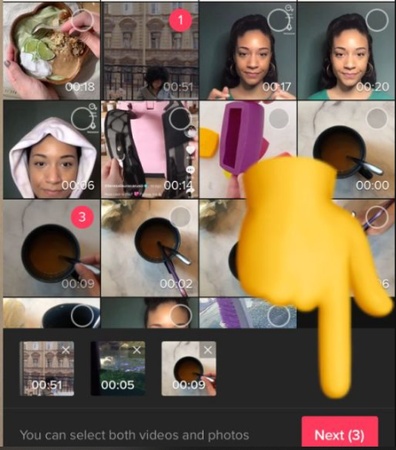
After editing is complete, select Next to get to the screen where you may customize your cover, caption, and other elements.
5 Step 5: Choose Cover and Add Caption
To increase views, pick a captivating cover image from your camera or clip and add an entertaining caption. To instantly upload your TikTok reel with images and music, tap the Post button.
Part 6: How to Make a Reel With Canva
To learn how to make a reel with a picture, you do not need sophisticated video editing tools. You can produce scroll-stopping material in a matter of minutes with Canva. This is a detailed guide:
Step 1: Create a New Canva Design
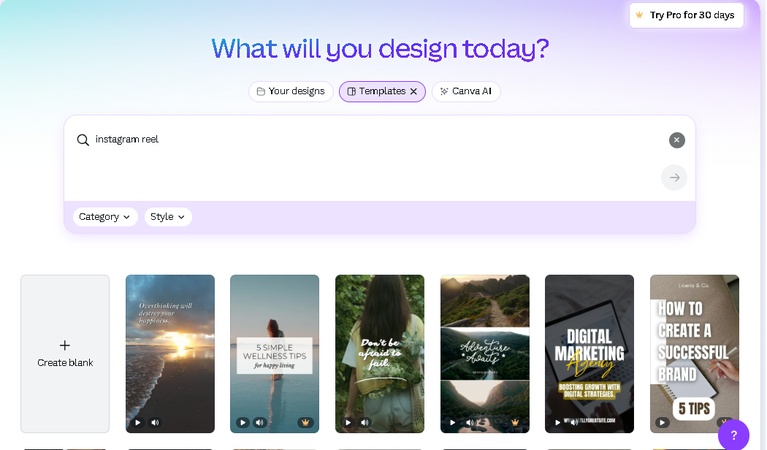
Sign up for a Canva account if you do not already have one, or log in. To find the ideal aspect ratio, click Create a Design and type Instagram Reel. Either start from scratch or select an existing template.
Step 2: Add Your Photos or Video Clips
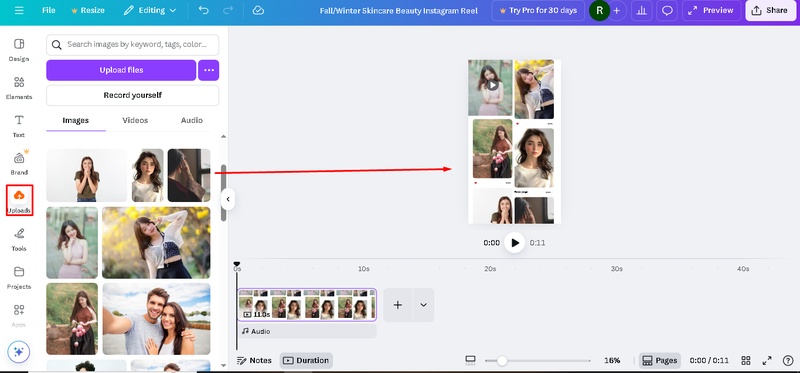
Click the Uploads option to add your images or brief videos. Drag and drop them into the slides of your template. For Instagram Reels, keep the entire video under 60 seconds.
Step 3: Apply Animations to Elements
After selecting any word, picture, or object, click the toolbar's Animate button. Select from animations such as Pan, Pop, Rise, and Fade. To create a dynamic appearance, you can animate individual slides or entire slides.
Step 4: Add Transitions and Music
In between pages, click the + symbol and choose Add transition. To achieve seamless scene changes, use transitions like Slide, Circle Wipe, Dissolve, etc. To select music from Canva's library or add your own, use the Audio option.
Step 5: Include Overlays and Text
To add bold headings or captions, use the Text tool. To highlight important details or attract attention, use shapes, symbols, emoticons, stickers, or branding overlays.
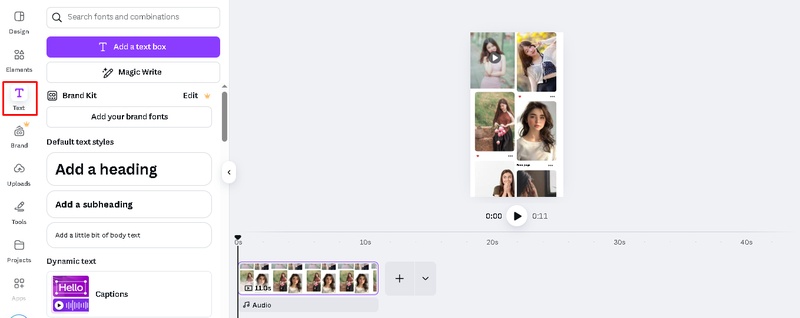
Step 6: Preview the Reel and Download It
To get a preview of your complete reel, press the Play button. Slides, music, and transitions can all be trimmed, clipped, or timed using the timeline. Select the MP4 video format after clicking Share and then Download. This is the complete guide on how to make a reel with background music effectively.
In Conclusion
Learning how to make a reel with photos doesn’t require costly equipment or sophisticated software. Simple images can be transformed into visually striking, music-synced reels with the help of programs like HitPaw Edimakor (Video Editor) . It is ideal for brand storytelling as well as intimate occasions. In a few simple steps, add music, apply transition effects, and export in excellent resolution.
Leave a Comment
Create your review for HitPaw articles


