Nothing ruins a great clip faster than blocky pixels and noisy grain. You record a perfect moment, but poor light, low bitrate, or wrong settings turn it into a blur. That problem is common for creators, phone shooters, and livestream viewers.
The good news: many fixes exist, from quick playback tricks to powerful enhancers. This blog shows how to fix pixelated videos using five practical methods.
You’ll learn simple repairs, reliable tools, and shooting tips to prevent future issues. Read on to restore clarity, reduce noise, and keep your footage looking sharp every time.
Part 1: What Causes Grainy/Pixelated Video?
Grainy or pixelated video usually happens because of light, camera, or file handling. If you know the causes, you can fix or avoid them fast. Common causes are as follows:
- Shooting in low or poor lighting at night.
- Excessive compression to shrink file size.
- Converting to low-quality formats.
- Using cameras with small sensors.
- Wrong camera settings while recording.
- A low aperture that limits light intake.
- High ISO settings raise sensor noise.
Most issues come from weak light, cheap gear, or heavy compression. To make it better, you can add light, use a lower ISO, open the aperture, a better sensor and use less compression on export. Test settings, external lighting, try faster lenses and try daylight before critical shoots.
Part 2: How to Fix Grainy/Pixelated Videos
Fixing grainy or pixelated videos doesn’t have to be complex. There are simple tools and methods that can bring back clarity in just a few minutes. From quick fixes to professional software, each option helps improve quality. Let’s start with one of the most effective solutions.
1. Use Edimakor Vidoe Enhancer
Edimakor Video Enhancer is a tool designed to make blurry or grainy videos look clear again. It uses smart technology to enhance video quality without requiring complex editing. You can rely on it when videos look pixelated after recording or compression.

The software is compatible with other formats and operates legacy and contemporary recordings. It corrects colors, sharpness, and brightness. So the final video looks natural. Many people use it to restore travel clips, family recordings, or online content that has lost quality.
Edimakor Video Enhancer focuses on keeping details while reducing noise. This means your videos appear sharper and smoother. It’s a simple way to bring back quality without needing professional editing skills.
How to Fix Grainy Videos with Edimakor Video Enhancer?
Below are the steps on how to fix pixels on videos using Edimakor Video Enhancer.
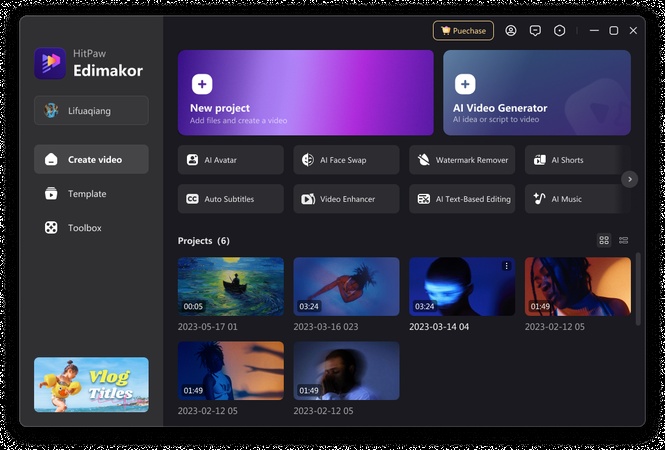
Step 1: To begin with, download and install Edimakor on your computer. Launch the tool. Then click "Video Enhancer" from the main interface.
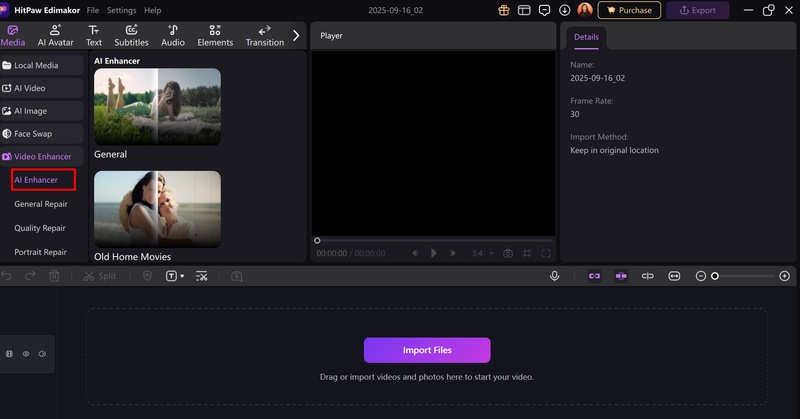
Step 2: Select the mode you want to enhance your video—for example, an AI enhancement.
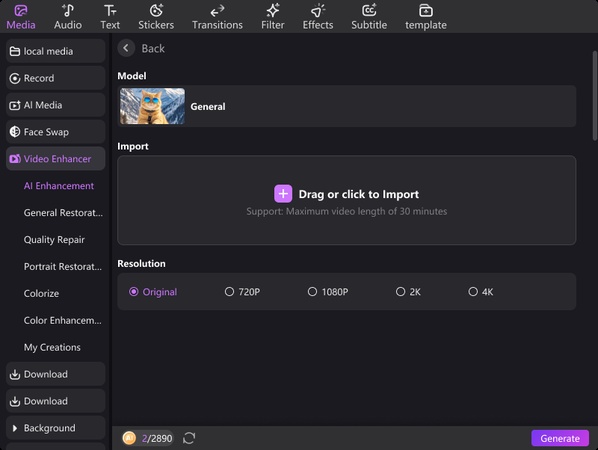
Step 3: Now, upload your video and select the resolution. Finally, click "Generate" and your enhanced video will appear on "My Creations".
2. Remove Video Noise
You can also fix grainy or pixelated videos using Edimakor Background Noise Remover . Grain and pixelation often come with distracting visual noise. This tool helps reduce it and makes the video look cleaner.
It works by detecting noise patterns and softening them without losing detail. The output is a smoother playback that consists of less distraction. It is popular amongst many users as it uses old recordings, videos in low-light, and mobile.
Edimakor Background Noise Remover makes your content more watchable and professional. It’s simple to apply and gives fast results. Cleaner visuals mean better focus on the actual video story, not the flaws.
How to Fix Pixelated Videos with Edimakor Background Noise Remover?
Here are the steps to use Edimakor Background Noise Remover to fix grainy videos.
Step 1: First, download and install HitPaw Edimakor . Go to Noise Reduction from the Toolbox to launch the noise reduction tool.
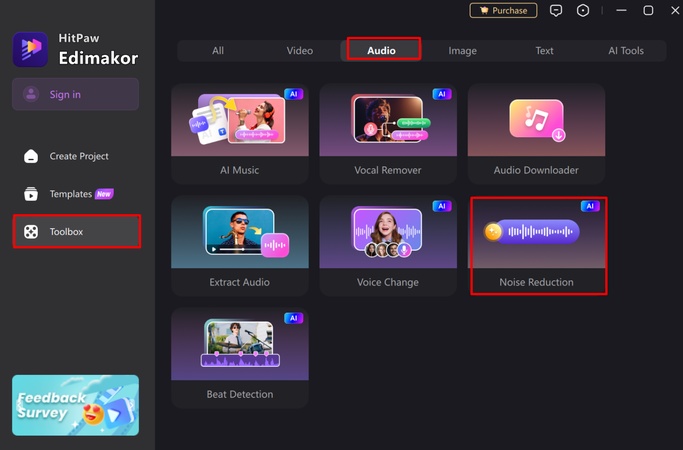
Step 2: Next, import your audio file and turn on the Noise Reduction button. The tool will automatically remove all background noise immediately.
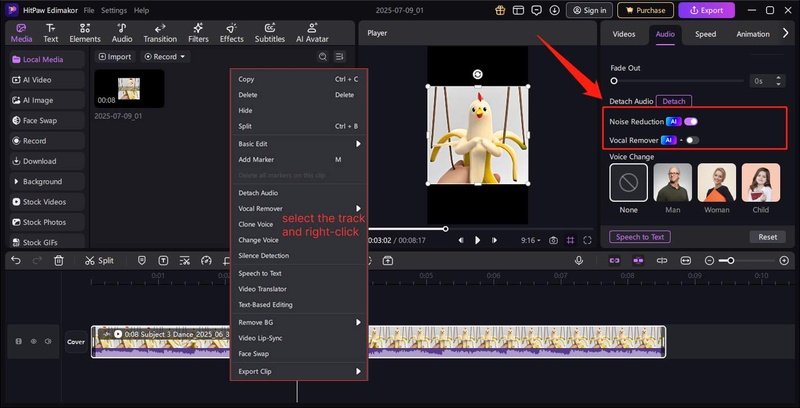
Step 3: When Edimakor reduces noise for your files, click the Export button to download the file for further use.
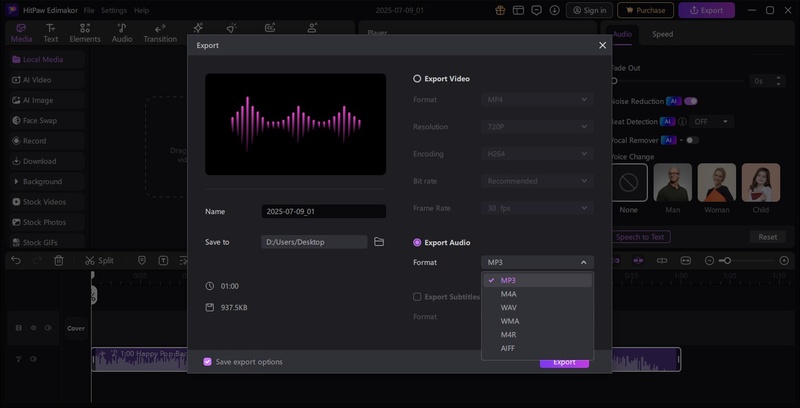
3. Use Adobe After Effects
Adobe After Effects gives precise tools to fix grainy video. You can apply built-in noise reduction effects. You can adjust the detail with the sharpening and blur controls. You can track problem areas and treat them per shot. You can correct exposure and balance color to reduce visible noise.
You can use temporal smoothing for flicker and frame noise. You can preview changes in real time to compare versions. You can export with higher bitrates to preserve improvements.
How to Fix Pixels on Videos with Adobe After Effects?
Follow the steps below to fix pixelated videos using Adobe After Effects.
Step 1: To begin with, import your grainy video into Adobe After Effects.
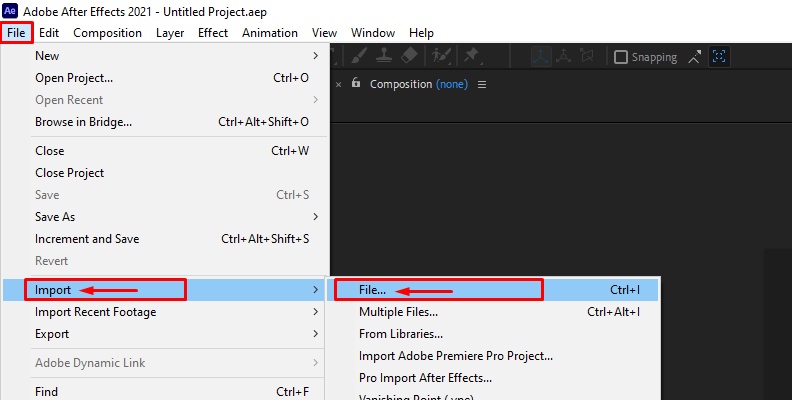
Step 2: Go to Effects > Noise & Grain > Remove Grain.
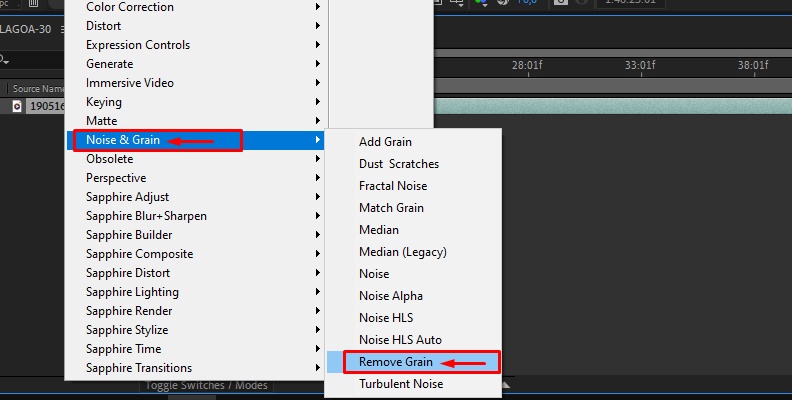
Step 3: The Remove Grain effect will automatically identify noise samples to fix your grainy video. You can also manually set it.
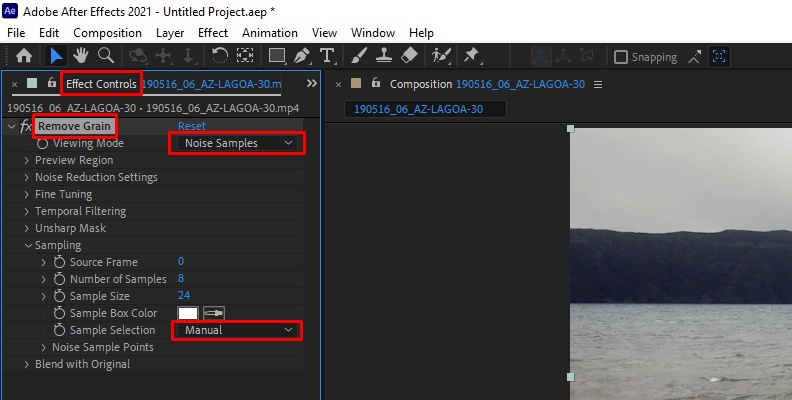
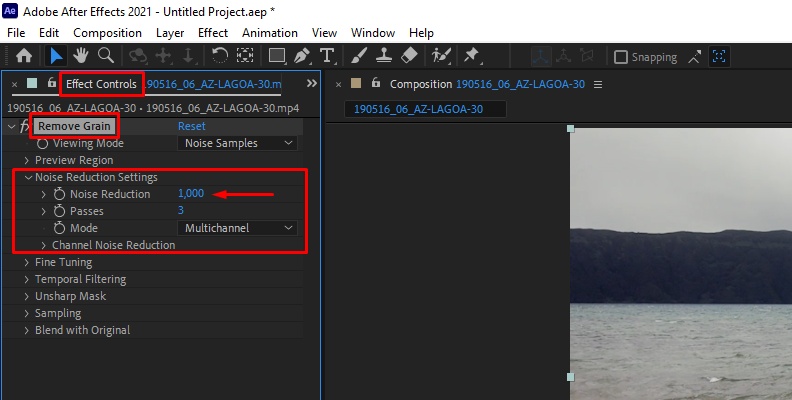
Step 4: Adjust the remove grain effects settings.
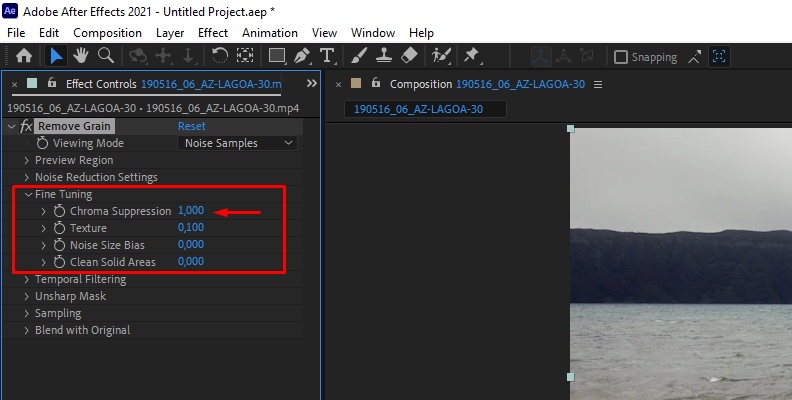
Step 5: Now, fine-tune your video to retain sharpness.
Step 6: You can also enable temporal filtering to remove noise between frames.
Step 7: Go to File > Export > Add to Media Encoder Queue. Choose the format you want. Select the output settings and where to save the file. Click Render. Wait while After Effects exports the video without grain.
4. Try VLC Media Player
VLC Media Player is an open-source, free multimedia player. It opens many file types without extra codecs. It offers simple image and video filters. Those filters let you tweak brightness, contrast, and sharpness quickly. You can preview changes in real time.
VLC is compatible with Windows, macOS, Linux, Android, and iOS. It stays lightweight and fast. It’s not a dedicated photo editor. But it’s handy for quick fixes when you don’t have advanced software. If you like, I can suggest professional photo editors for deeper noise reduction.
Steps to Use VLC Media Player to Fix Grainy Videos
Below are the steps to use VLC Media Player.
Step 1: To start, open the VLC media player on your computer.
Step 2: Go to Tools > Preferences.
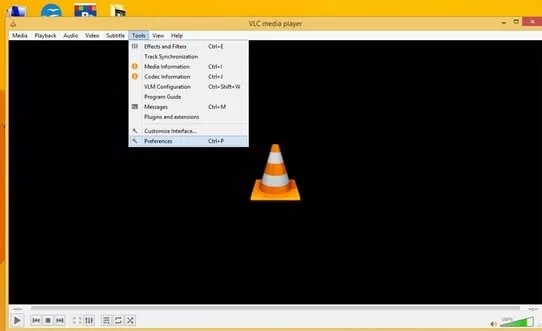
Step 3: Go to the ‘Inputs/Codecs’ category. Then, opt for ‘Always fix.’ Finally, hit ‘Save’ button to confirm the changes.

5. Reduce the Playback Window Size
You can make online grainy videos look clearer by reducing the size of the playback window. A smaller screen hides some of the noise and makes details appear sharper. This trick works only for streaming videos you can’t edit or save.
It doesn’t repair the file, but it improves how the video looks while watching. For low-quality online clips, shrinking the window is often the easiest way to reduce distraction from visible grains. It’s a quick, simple fix when other editing tools can’t be used.
Part 3: Tips to Prevent Grainy Video in Future Shoots
Small fixes prevent grain before you shoot. Plan light and settings ahead. Check gear and file settings quickly. These steps save time and improve results.
Focus on Lighting
Good lighting reduces noise. Use natural daylight or soft studio lights. Avoid shooting in dark rooms or at night without support. A brighter scene lets you keep ISO low and prevents grain.
Adjust Camera Settings
Set ISO to the lowest value possible. Get the aperture more open to allow more light. Smooth and good motion with balanced shutter speed. Minor adjustments bring a lot of clarity.
Choose the Right Camera Sensor
Smaller sensors on cameras are less sensitive when dealing with low light and capture more detail. When you rate or use a frequent shooter of low-light shots, then a larger sensor size lowers the grain and improves image quality.
Handle Files Carefully
Avoid compressing videos too much. Stick to high-quality formats when exporting. Each unnecessary conversion lowers resolution and creates more pixelation.
Test Before Recording
Record a short sample before filming the full scene. Check lighting, exposure, and ISO. This quick step helps you adjust settings early and save your video from looking grainy.
Conclusion
Grainy or pixelated videos often happen because of weak lighting, poor settings, or heavy compression. These problems can be fixed with the right methods. You can use editing tools, noise removers, or even simple playback adjustments. Planning ahead with proper light and correct camera settings also reduces the chance of noise.
If you wonder how to fix pixelated videos effectively, the answer is to use reliable software. Edimakor Video Enhancer is a simple yet powerful option. It restores clarity, reduces grain, and improves sharpness with ease. For anyone looking to keep videos clear and smooth, it’s a tool worth trying.
Leave a Comment
Create your review for HitPaw articles


