Shaky footage can ruin a great take in an instant. You nail the framing and lighting, hit record, and later the clip shakes so much you can’t use it. The fix isn’t always about reshooting or buying a new tool. A reliable software can often do the heavy lifting.
In this guide on how to stabilize video in After Effects, you’ll find four practical methods that suit different skill levels and shot types.
We will walk through Warp Stabilizer, the Tracker panel, classic stabilize-motion techniques, and useful plugins.
You’ll also see a faster, simpler alternative if you just want quick, reliable results without a steep learning curve. Read on and pick the right workflow for your footage.
Part 1: How To Stabilize Video In After Effects?
Stabilizing your video in After Effects becomes easy with the right tool and method. Below, we discuss four effective methods to stabilize shaky videos. Each method is helpful and practical. So, choose the one that best suits your workflow and needs.
1. Use Warp Stabilize VFX
After Effects has an inbuilt effect, Warp Stabilizer. It allows you to stabilize your video with just a few button clicks. The following are the step-by-step instructions.
Step 1: First, import your shaky video into After Effects. Then, create a new composition.
Step 2: Select the layer that has shaky footage in the timeline.
Step 3: Go to the Animation Panel and search for 'Warp Stabilizer'.

Step 4: Next, simply click twice on the given effect to apply it to the selected layer.
Step 5: After Effects processes the video and automatically stabilises it. It can be performed within several moments. This depends on the complexity and the length of your clip.
Step 6: Once After Effects completes analysis, adjust the stabilization settings under the “Effect Controls” panel. The default settings would usually perform well. Nevertheless, fine-tune the smoothness, crop, and other parameters to get the best output.
2. Use Tracker Panel
Another method for stabilizing video in After Effects is to use the Tracker Panel. This method involves setting tracking points with the help of the tracking box. Here are the steps to use the tracker panel:
Step 1: Open the Tracker Panel. For this, go to Window > Tracker Panel.
Step 2: From the different options, choose "Stabilize Motion".
Step 3: You'll now notice the tracking box appearing on your screen.
Position and adjust it in a spot on your screen where you see the object or person you are trying to follow is bright.
When there is a slight loss of position at any point in the video, press the stop button and use the box as a guide to put it back on track. Once the results are satisfactory, click on the Apply button and store the change. Then export your composition.
3. Use Stabilize Motion
The Stabilize Motion tool is one of After Effects’ classic methods for fixing shaky clips. It works best when you have a clear object or point to track. While it’s older than Warp Stabilizer, it still delivers solid results for many shots.
Step 1: Go to Window > Tracker in the top menu. Ensure the panel is visible before proceeding.
Step 2: Click Stabilize Motion in the tracker panel. A tracking box will appear in your layer. Place it in a spot with good contrast for accurate tracking.
Step 3: Hit play to start tracking. If the point drifts, stop and move the box back to its original position. Then continue tracking.
Step 4: Click Edit Target to confirm the right layer. Then hit Apply and choose “X and Y.”
Press the spacebar to preview. If the stabilization appears off, try again with a stronger tracking point.
4. Use Stabilization Plugins for After Effects
Third-party plugins add power when built-in tools fall short. They handle complex motion, parallax, and tricky frames more reliably. Plugins cost extra, but they save time on difficult shots.
- CoreMelt Lock & Load X — Tracks multiple points and smooths motion. Use it for fast, controlled stabilization.
- Mocha AE (Imagineer Systems) — Uses planar tracking to lock onto surfaces. Ideal for shots with perspective shifts or layered elements.
- RE:Flex (Vision Effects) — Uses optical-flow analysis for pixel-level stabilization. Select it when you require precise, natural motion correction.
Try a plugin when your footage has lots of movement or when a single tracking point fails. Test demos before buying to confirm the result matches your shot.
Part 2: Easier Alternative to After Effects for Video Stabilization
After Effects is great for professionals, but not everyone needs that complexity. It may be very time-consuming and overwhelming, particularly when you are inexperienced. A large number of designers simply desire to have a tool that is fast, easy to use, and functional.
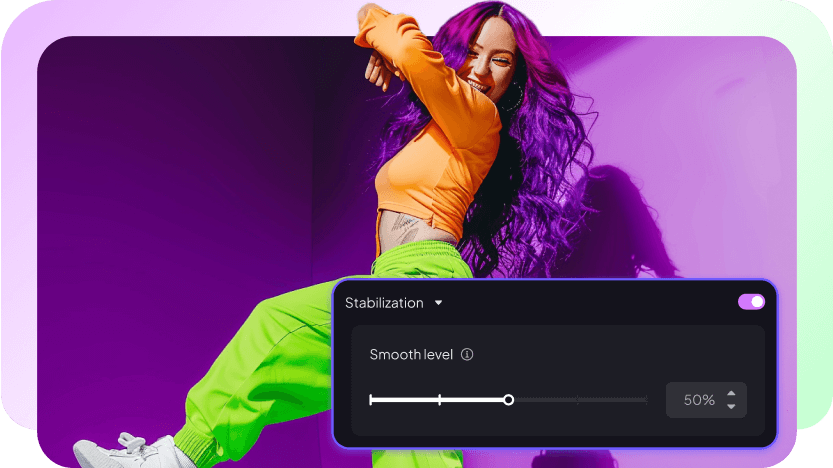
Edimakor offers precisely that. It’s a lightweight video editor with built-in stabilization. You import your video, click stabilize, and get a smooth result within seconds. No technical setup, no advanced panels. Just an easy way to fix footage.
It is also a complete editor that allows you to trim, add music, or even include transitions, in addition to stabilizing. It is designed to satisfy creators who want to focus on speed, non-cloud workflows, and tools that are easy to work with, rather than complex ones.


Key Features of HitPaw Edimakor
- One-click stabilization for shaky videos.
- Drag-and-drop timeline editing.
- Multi-track support for video, audio, and text.
- Built-in filters, effects, and transitions.
- Audio editing with music and voiceovers.
- Flexible export options for different platforms.
Conclusion
Knowing how to stabilize video in After Effects helps you stabilize shaky footage without hassle. Inbuilt features of the After Effects software, like Warp Stabilizer and the Tracker Panel, work for most projects. Plugins can add even more precision when the shot is complex. But After Effects can feel heavy for beginners or anyone who just wants quick results.
That’s where Edimakor stands out. It offers one-click stabilization, along with simple editing tools, in a clean interface. You don’t need advanced skills, and the results look smooth in seconds. If you want an easier way to fix shaky videos, download Edimakor today and give it a try to take your video editing to the next level.
Leave a Comment
Create your review for HitPaw articles