If you want to play subtitles in Windows Media Player then you can go ahead with the given guidelines to not only add but also download and customize the subtitles easily.
HitPaw Edimakor (Video Editor)
- Create effortlessly with our AI-powered video editing suite, no experience needed.
- Add auto subtitles and lifelike voiceovers to videos with our AI.
- Convert scripts to videos with our AI script generator.
- Explore a rich library of effects, stickers, videos, audios, music, images, and sounds.

Part 1: How to Add Subtitles to Windows Media Player
Now that you have clearly learn how to add subtitle file in Windows Media Player, now it's time to learn the steps that you can follow to add that particular subtitle file in Windows Media Player.
Open Video Using in Media Player
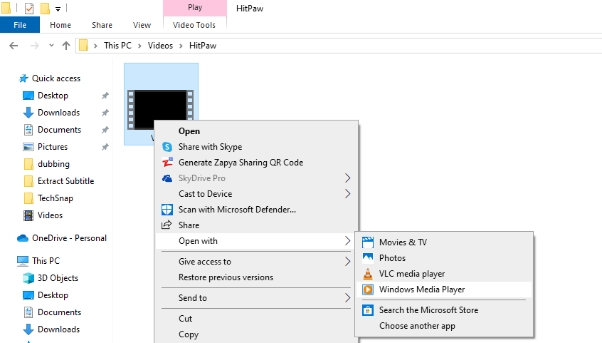
First of all you have to move to the folder where you have saved your specific video. Then you have to right click on it and select Open With Windows Media Player.
Access the Subtitle Option
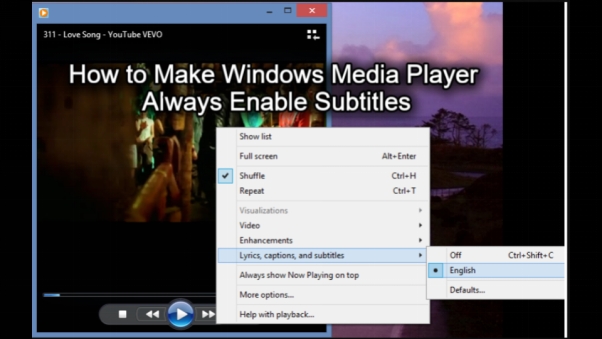
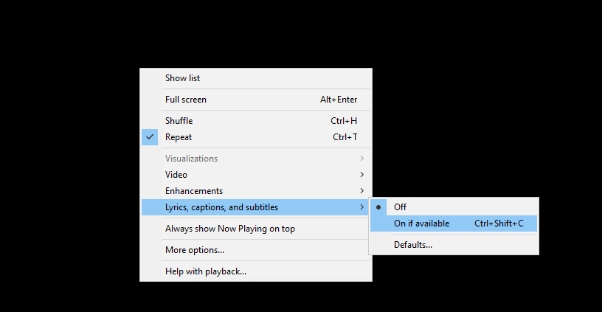
Once the video opens in Windows Media Player you have to right click on the video anywhere on the screen. A small options box will appear on the screen. You have to look for the Lyrics, Captions and Subtitles option. Select On if available.
Make Sure the Subtitle File is Available
The last step of how to add subtitle file to Windows Media Player is to make sure that you have downloaded the subtitle file in the same folder as the video file and with the same file name. The video will start running with the subtitles that you added.
Part 2: How to Make Windows Media Player Always Enable Subtitles?
Learning how do i turn on subtitles in Windows Media Player is essential for those who want to watch videos along with subtitles or foreign language translation. Here’s the simple guide:
Open WMP and Access the Menu Tools Menu
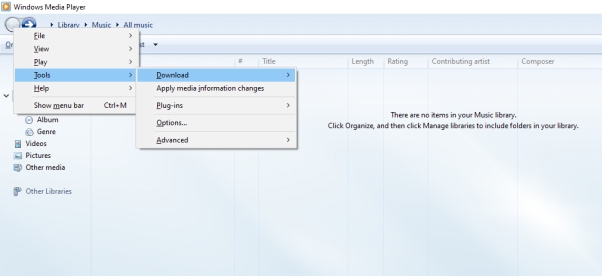
First of all, you have to launch Windows Media Player on your device and move to the top menu. Now, you have to click on the Tools option or press Alt + T to open the tools menu.
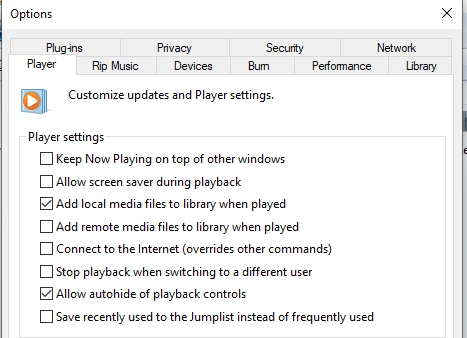
Access Options Menu and Security Tab
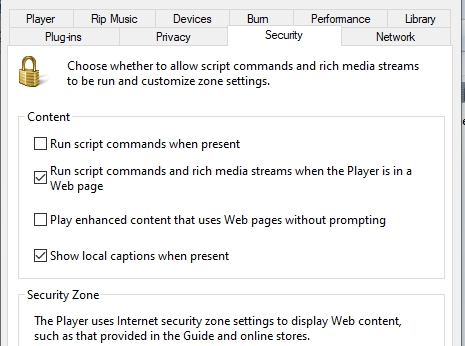
Once you have opened the Tools menu, choose the Options button from the drop down list. A new window will open where you can modify settings related to the video playback including subtitles. In the Options window, select the security tab and you will see a section where you can manage how Windows Media Player handles security features and other playback settings.
Enable the Subtitles
Inside the security tab you have to look for the option Show Local Captions when Present and check the box next to it. Now if you need to know how do i turn off subtitles in Windows Media Player, you can follow the same steps.
Part 3: How to Download/Translate Subtitles from Windows Media Player?
One of the most useful tools for downloading and translating subtitles to a video played on Windows Media Player is HitPaw Edimakor. Here are the steps to use this amazing tool:
-
Step 1: Open HitPaw Edimakor (Video Editor)
First of all you have to make sure that you have downloaded HitPaw Edimakor to your device. If not then don't worry, just move to its official website and download HitPaw Edimakor for PC. Tap on Create a Video option.

-
Step 2: Add the Video
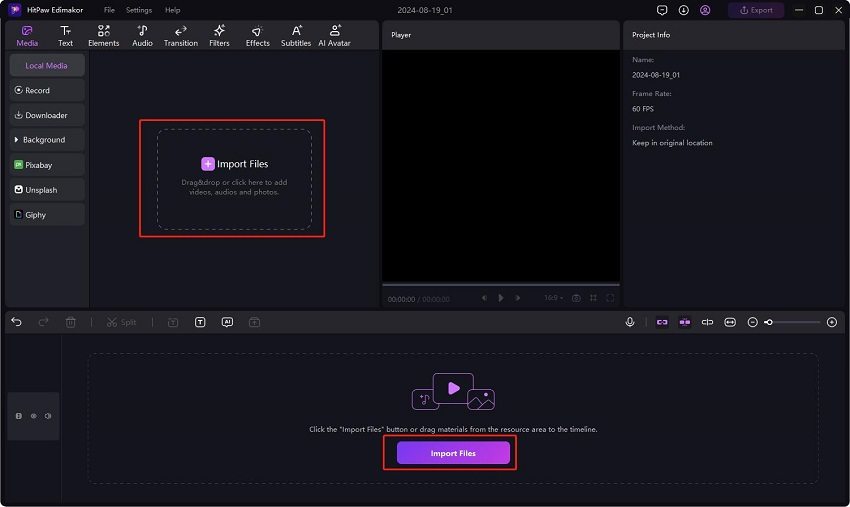
On the main screen you will see the media tab, open it and select the import option. Here you will be allowed to import the video where you want to add and then download the subtitles.

-
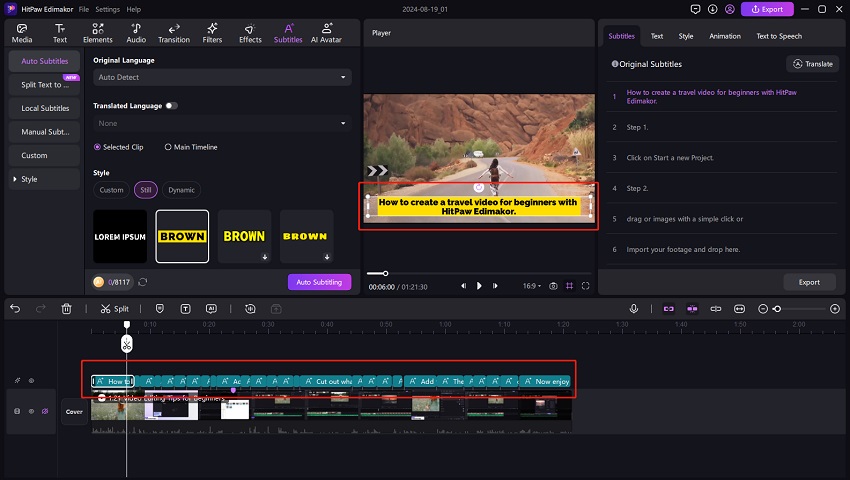
Step 3: Use the Auto Subtitles Feature
Next you have to go ahead with the Auto Subtitle feature that will be available in the Subtitles tab. This feature will automatically add subtitles to the video that you can download afterwards.

-
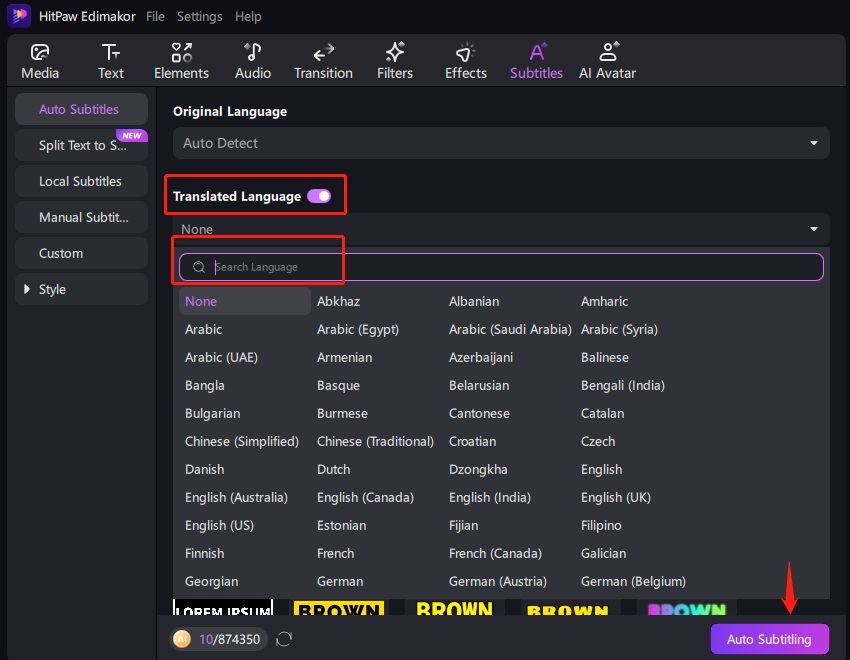
Step 4: Translate the Video
With Edimakor's ai video tranlator feature, you can add precise subtitles and dub your videos in various languages.

-
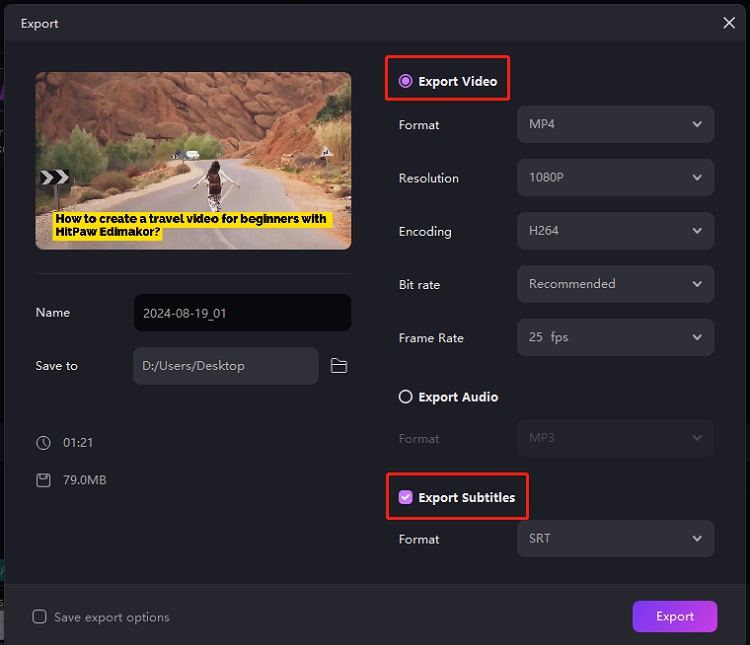
Step 5: Export the Subtitle File
The last step of how to download subtitles for Windows Media Player is to export the subtitle file. For this, you have to tap on the Export option from top of the screen that will take you to export settings. Here, you can download the subtitles file in any format.

Part 4: How to Change Subtitle Color in Windows Media Player
Now we have done all our tasks and have successfully added the subtitles file in Windows Media Player but what if you want to change the color of the subtitles in the video for any purpose? Here's, how to adjust subtitles in Windows Media Player for more accessibility:
Move to Settings
To change subtitle color Windows Media Player, you have to open settings on your device. You can simply search for the settings by typing it in the search bar available on the left side of the toolbar.
Select Ease of Access
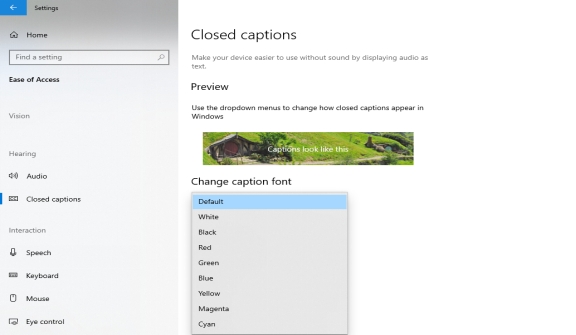
Here on the Settings screen you will see multiple options. You have to go ahead with the Ease of Access option. You have to scroll down until you see the closed captions option.

Change the Subtitles Colour
Here, you will see the multiple options for adjusting the appearance of subtitles. You can go ahead with default colour or can choose colour of your own choice from the given options. This is how you can learn how to change subtitle color in Windows Media Player effortlessly.
Final Words
By following the above-mentioned steps, you can make sure the Windows Media Player always enable subtitles. Whether you want to add the subtitles, download the subtitles, or customize the subtitles in Windows Media Player, the above guide will be helpful for you. You can access HitPaw Edimakor (Video Editor) to download the subtitles for Windows Media Player.
Home > Subtitle Tips > 😀 How to Make Windows Media Player Always Enable Subtitles[2026]
Leave a Comment
Create your review for HitPaw articles




Yuraq Wambli
Editor-in-Chief
Yuraq Wambli is the Editor-in-Chief of Edimakor, dedicated to the art and science of video editing. With a passion for visual storytelling, Yuraq oversees the creation of high-quality content that offers expert tips, in-depth tutorials, and the latest trends in video production.
(Click to rate this post)