Have you ever watched a video where the text gently fades in and out, perfectly timed with the speaker’s dialogue? That looks neat, right?
Using text-fading animation is a powerful way to engage the audience and set the overall mood of the video. One of the best tools for achieving this is Adobe Premiere’s text fade-in and out effects.
But how do you create these seamless animations?
In this article, we will explore how to use Premiere Pro’s text effect, text fading out, and fading in techniques. Plus, we’ll share some creative ideas to help your video text stand out even more!
Part 1: How to Fade Text in Premiere Pro: Step-by-Step Guide
You can create a fade text animation in Premiere Pro using the built-in Linear Wipe effect and customize it with keyframes for a smoother result. Here’s how it works.
Step 1. Import your videos into Premiere Pro. Select the “Type” tool to add a text box. Then, write your desired text.
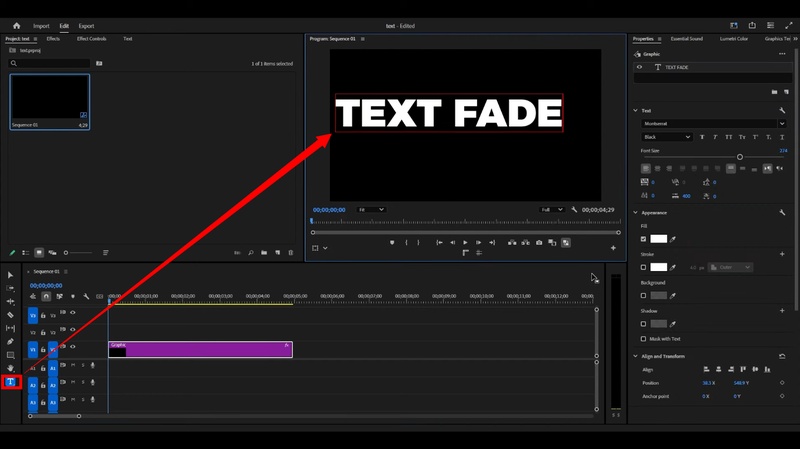
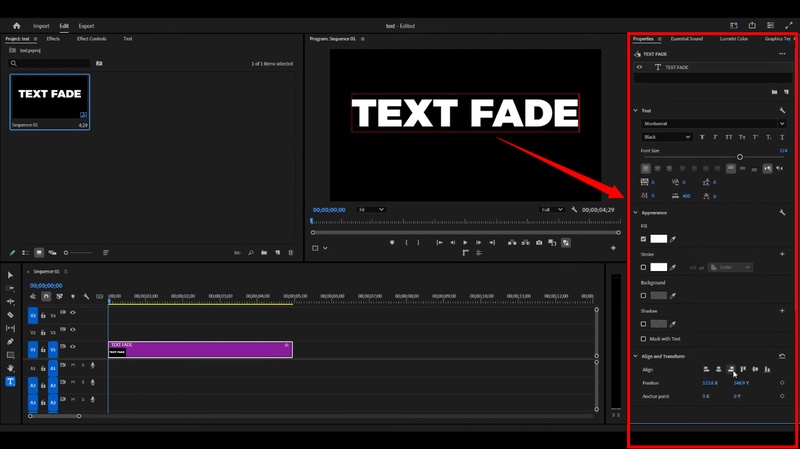
Step 2. Go to the Properties panel on the right and adjust the text alignment, style, and appearance.
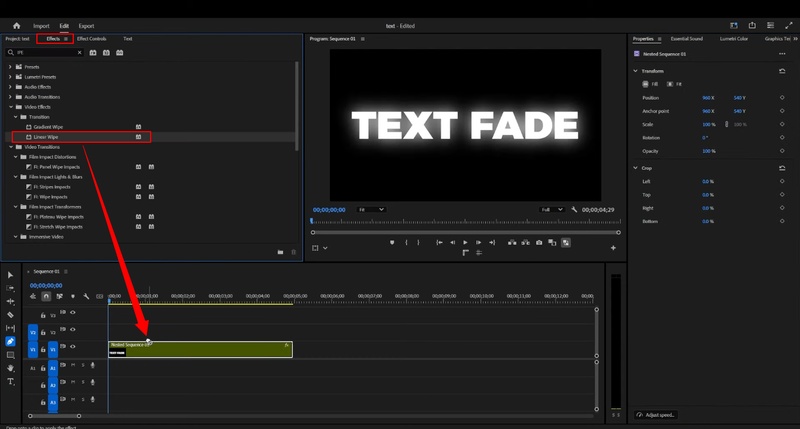
Step 3. From the left panel, click “Effects.” Then, select the “Linear Wipe” effect and drag it over the text layer twice.
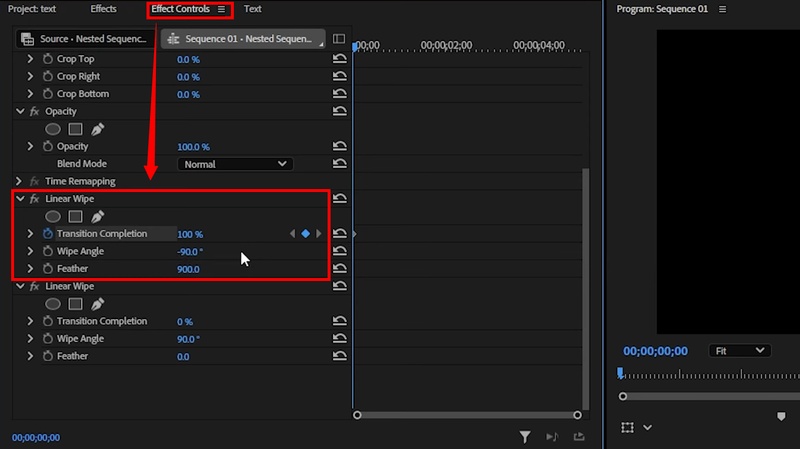
Step 4. Select “Effect Controls” and expand the first “Linear Wipe” option. Then:
- Click the stopwatch button for “Transition Completion.” Then set it to 100%.
- Set “Wipe Angle” to -90.
- Set “Feather” to 900.
Step 5. Move the timeline slider to the right. Then, set the “Transition Completion” to 0%.
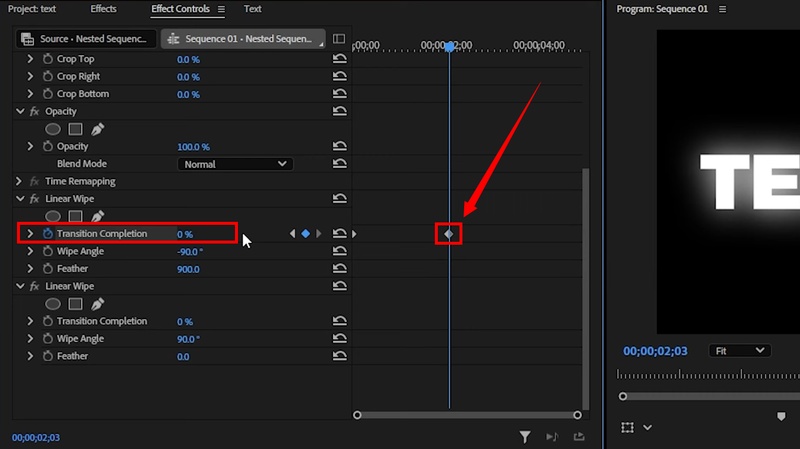
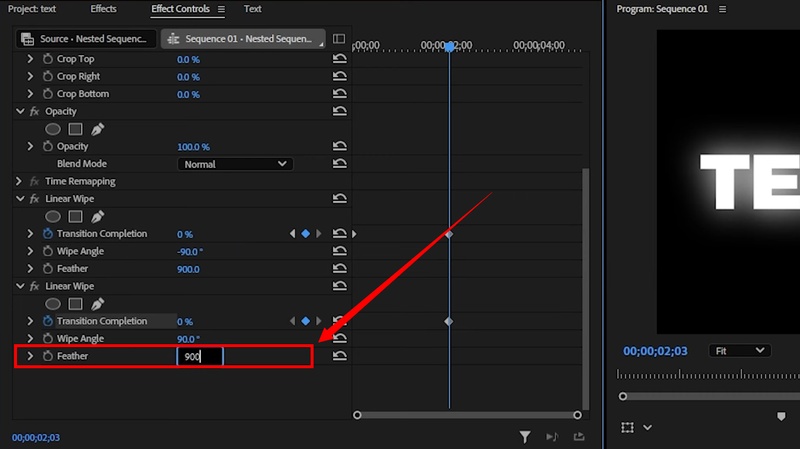
Step 6. Expand the second layer of “Linear Wipe.” Click the stopwatch icon for “Transition Completion.” Then, change the “Feather” value to 900.
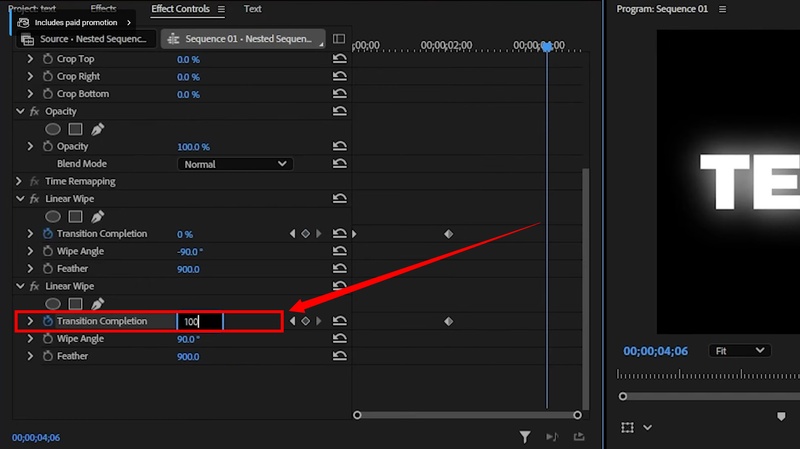
Step 7. Move the timeline slider a few seconds forward. Then set the “Transition Completion” to 100%.
Part 2: Other Ways to Create Text Animations in Premiere Pro
Apart from Adobe Premiere’s text fade in and out effects, there are several other ways to add more flair to your video’s titles. Let’s explore the steps for these in detail.
-
Way 1. Use the Transform Effect for Motion Animation
Step 1. Open “Effects” and search for “Transform.” Then drag the effect over the text layer.
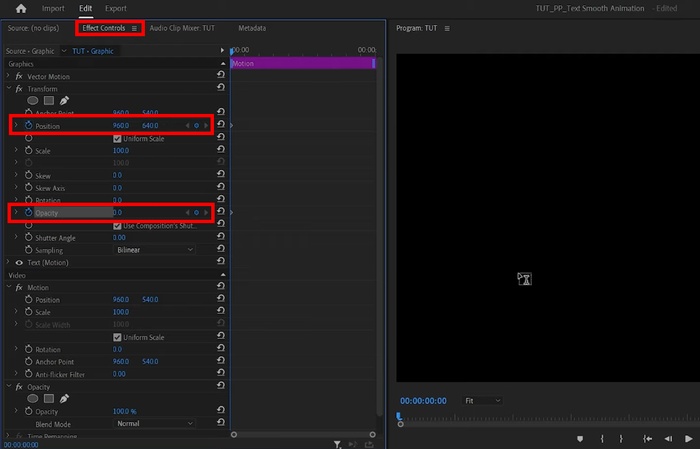
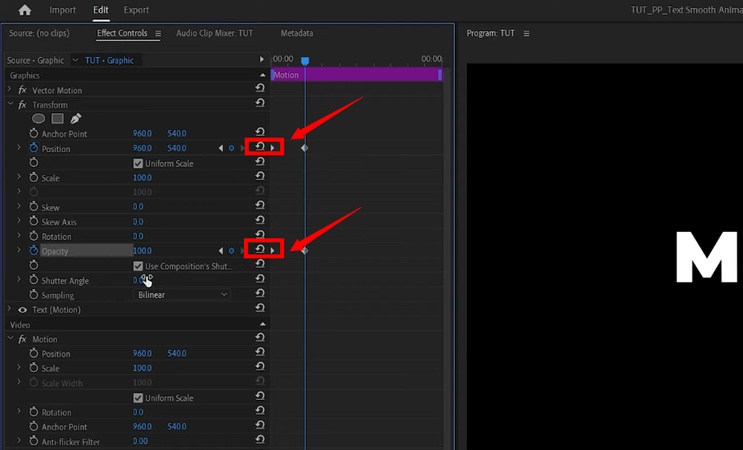
Step 2. Go to “Effect Controls” and expand the “Transform” option. Adjust the “Position” value to 640. Then, set the “Opacity” to zero.

Step 3. Move the playhead by a few seconds. Then, reset the values for “Position” and “Opacity.”

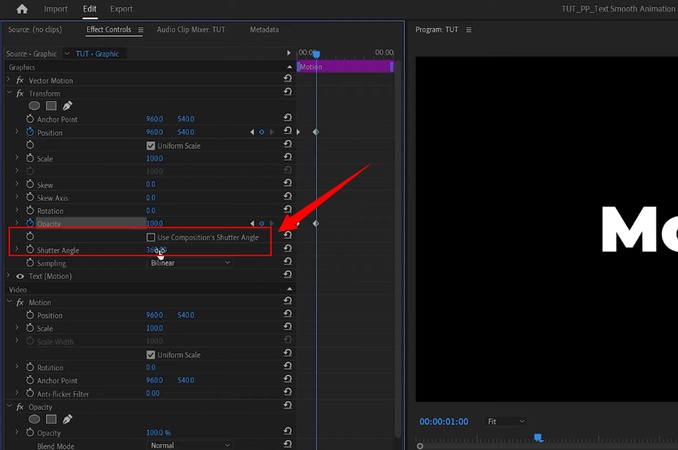
Step 4. Uncheck the “Use Composition's Shutter Angle” option. Then, increase “Shutter Angle” to 360 for a motion blur effect.

-
Way 2. Use the Crop Effect for Typewriter Animation
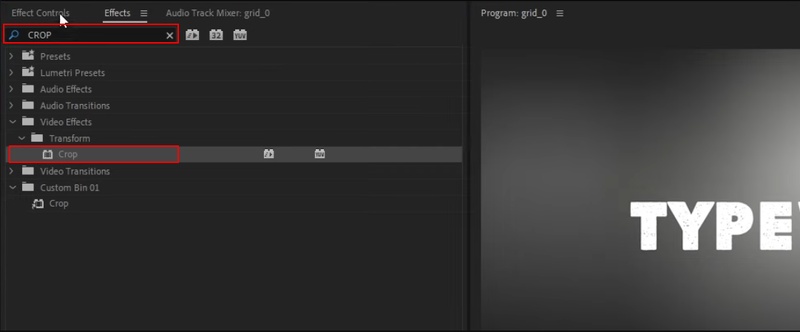
Step 1. Select “Effects” from the top left. Search for the “Crop” effect and add it to the text layer.

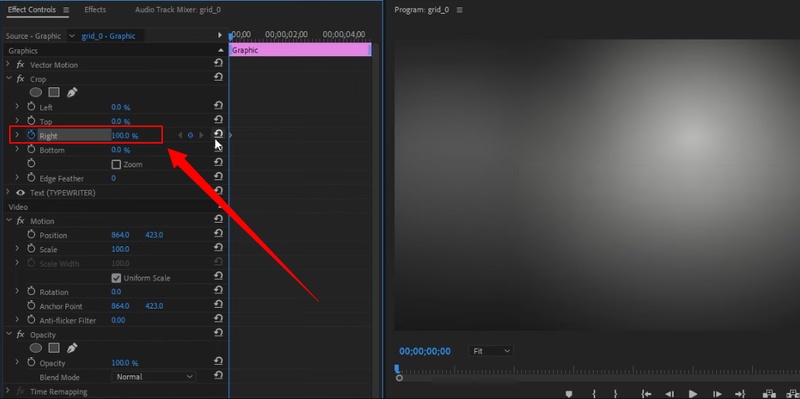
Step 2. Go to “Effect Controls” and expand the “Crop” effect. Then, select the stopwatch button next to “Right” and change the value to 100.

Step 3. Move the slider ahead a few seconds and reset the value for “Right.”
Step 4. Drag the keyframe back and forth to adjust the speed of the animation.
-
Way 3. Scale the Text Motion for a Cinematic Animation
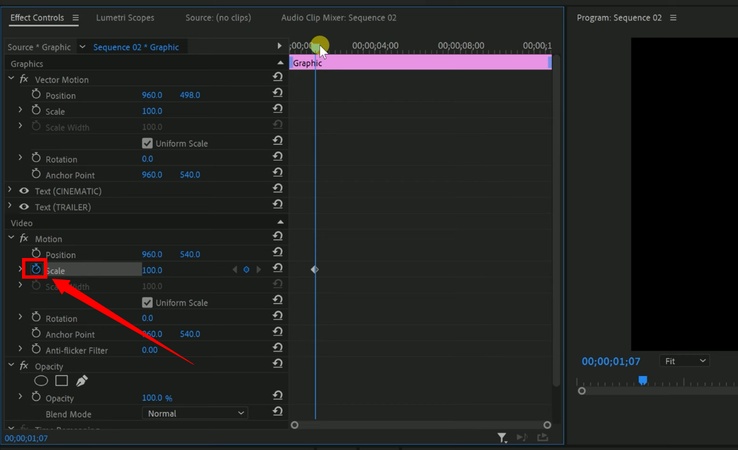
Step 1. Go to “Effect Controls” and move the playhead forward by a few frames.
Step 2. Click the stopwatch icon next to “Scale” to add a keyframe.

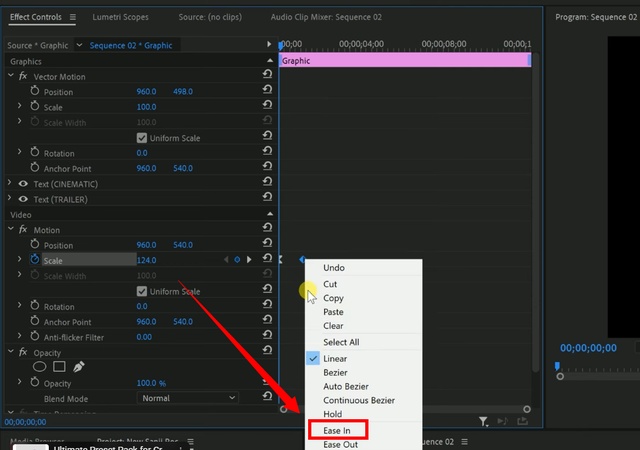
Step 3. Move the playhead back to the beginning of the video and increase the scale value to 124.
Step 4. Right-click on the first keyframe and choose “Ease Out.” Similarly, right-click and choose “Ease In” for the second keyframe.

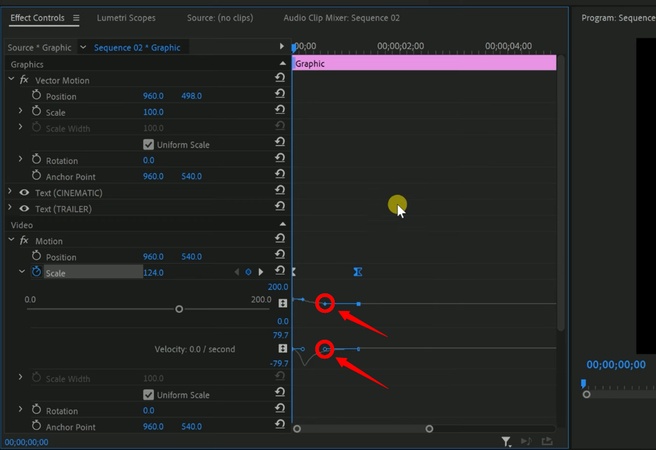
Step 5. Expand the Scale dropdown and move the keyframe handles to the right.

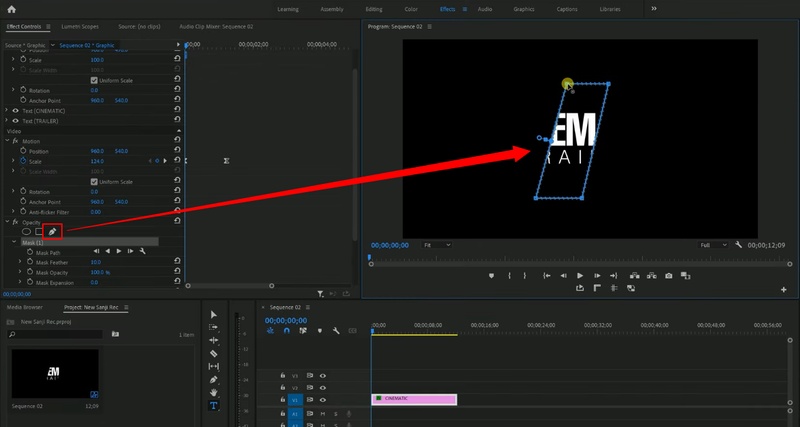
Step 6. Select the “Pen” tool under “Opacity.” Draw a box over the text.

Step 7. Adjust “Feather” to your liking and click the “Mask Path” stopwatch icon.
Step 8. Move the mask to the left until the text disappears.
Step 9. Move the playhead forward a few frames. Then, adjust the mask to the right until the text isn’t visible.
-
Way 4. Use Track Matte Key for Video-in-Text Effect
Step 1. Add a text box and go to the “Essentials Graphics” panel. Increase the text size and select a large font such as Montserrat.
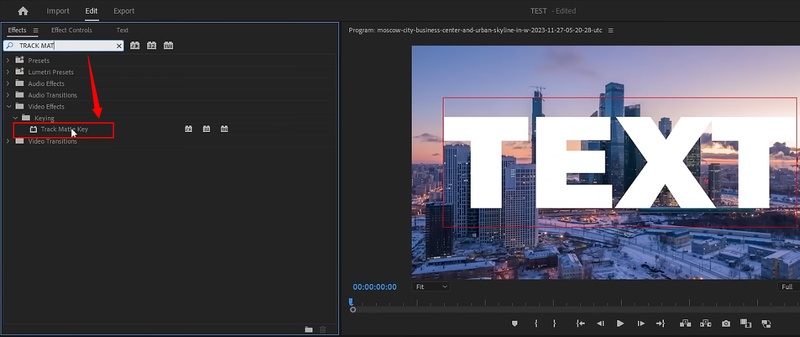
Step 2. Select the “Effects” tab from the left. Search for “Track Matte Key” and add the effect to the video clip in the timeline.

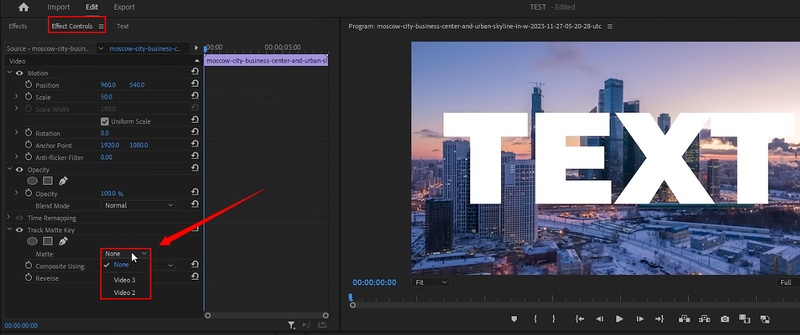
Step 3. Switch to “Effect Controls” and expand the “Track Matte Key” option.
Step 4. Click the dropdown for “Matte” and choose the layer your text is placed on.

Part 3: Better Way to Fade in/Out Text in Video: HitPaw Edimakor
Premiere Pro may help you add fade text animations, but after several manual editing steps. If you’re not an advanced video editor, you’ll have a hard time getting creative with all these complex settings.
That’s where HitPaw Edimakor can help! It lets you fade-in/out text quickly with preset animations, so you don’t have to spend hours on manual editing steps or complex navigation.
Even better, you can style your text your way! Edimakor gives you complete control over customizing the text properties so it matches the video’s theme perfectly.
Key Features of HitPaw Edimakor
- Dynamic Text Effects: Transform static text with 60+ engaging animation styles.
- Preset Library: Access thousands of animated presets with effects like fade, blur, typewriter, and more.
- Customizable Options: Choose from 1,000+ fonts, colors, alignments, and styles.
- Themed Templates: Ready-made text templates for social media, marketing, vlogs, promos, festivals, and more.
- Real-Time Preview: Instantly preview and adjust fade animations before and after applying.
Steps to Fade In/Out Text in HitPaw Edimakor
-
Download and install HitPaw Edimakor on your computer. Launch it and click “New Project” to get started. Then, import your video files and drag them to the timeline.
-
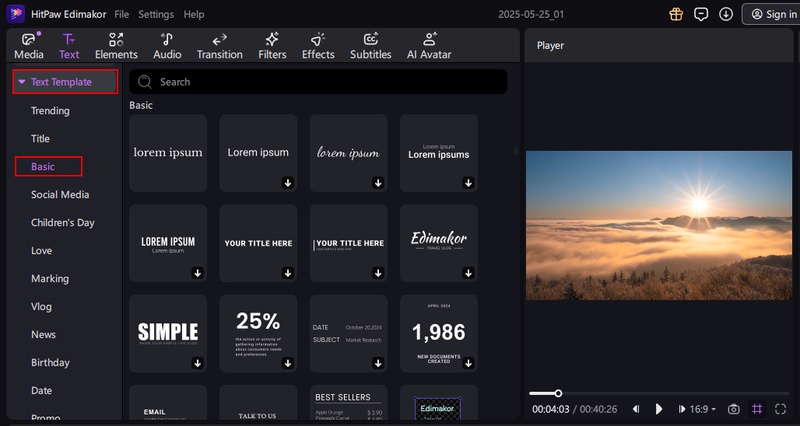
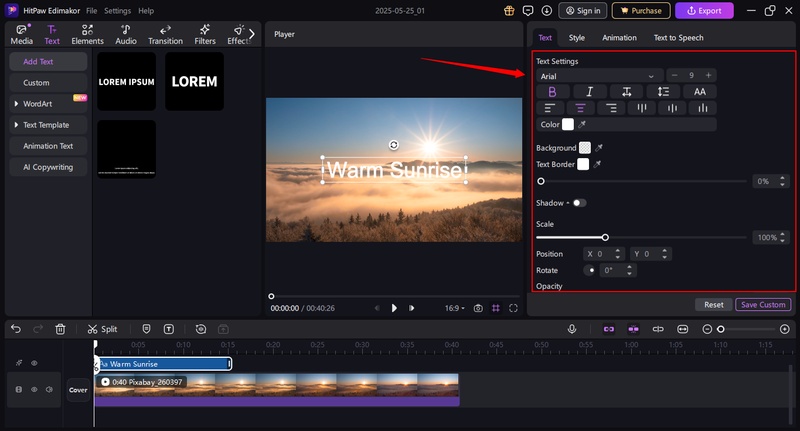
Click “Text” from the top. You will see several options for adding text on the right panel. From here:
1. Select “Text Template” and choose the “Basic” category. Then choose your desired fade-in/out animation from the various presets.

2. Alternatively, click “Add Text.” Then, select a default preset and drag it to the timeline.

-
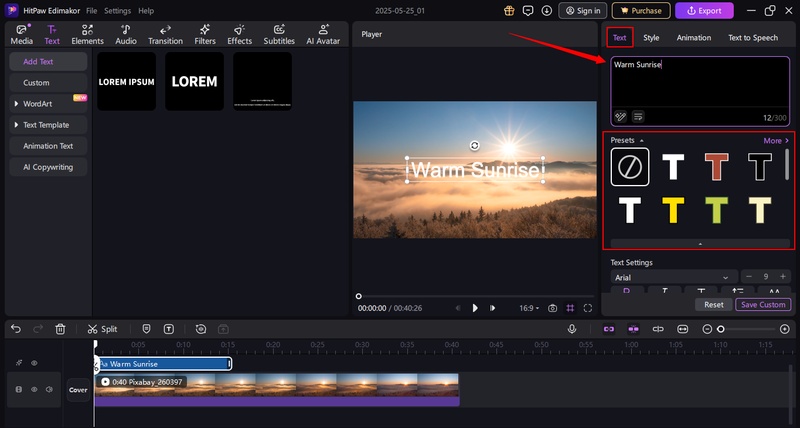
Go to the right panel and choose the “Text” menu. Write your desired text in the text box. Then choose a preset from the various options.

-
You can also manually adjust the text settings, such as font, style, alignment, background, shadow, and more.

-
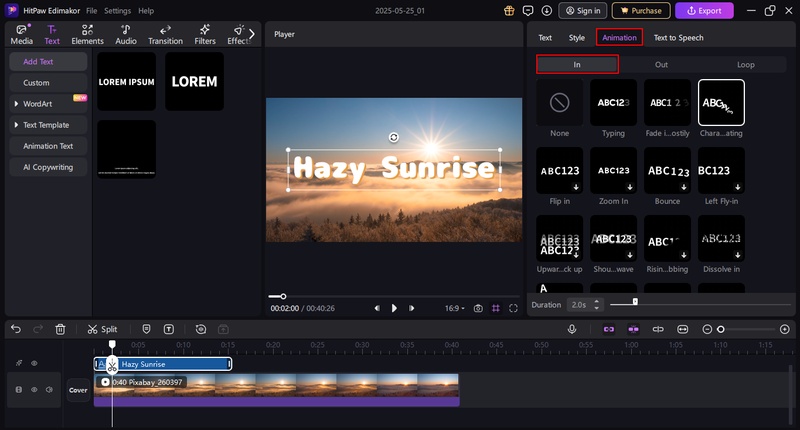
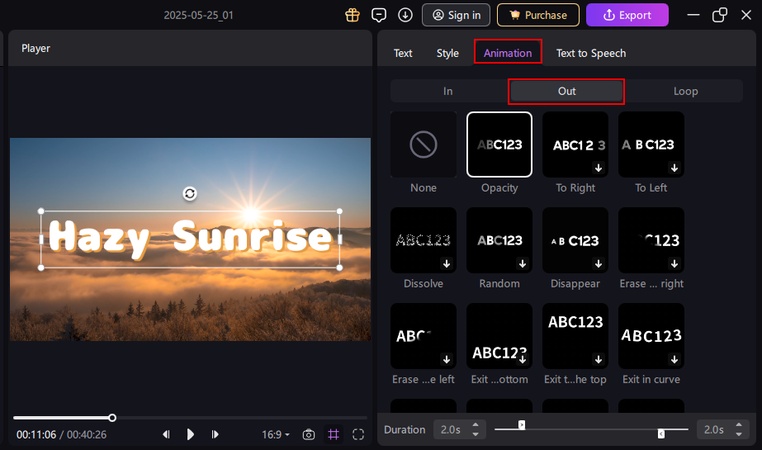
Switch to the “Animation” tab in the right panel to animate the text. From here you can:
1. Select the “In” option to find all the fade-in animations. Download the one you want to apply to the text layer.

2. Similarly, select the “Out” option to access the fade-out animations. Then download to apply your desired animation.

-
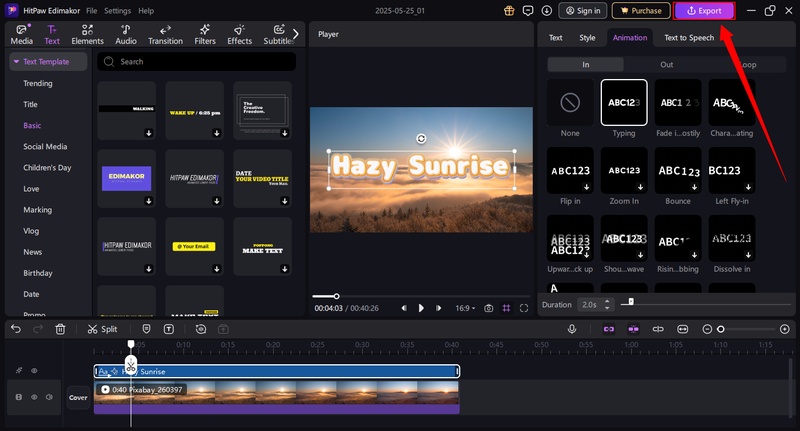
Play the video preview to check the animated text. And if you like the playback, click “ Export ” at the top right to save your video.

Part 4: Edimakor vs Premiere Pro: Which is Best for Fade-In or Fade-Out Text Effects
Now you know all about Edimakor and Premiere Pro’s text effect, text fading out and in animations. You must be wondering, “Which video editor should I use to animate my video’s titles?”
To make your decision easier, go through the detailed comparison below.
| Aspect | Adobe Premiere Pro | HitPaw Edimakor |
|---|---|---|
| Ease of Use | Professional-grade, requires a learning curve | Beginner-friendly interface, Easy editing tools |
| Text Fade-In/Fade-Out | Manual keyframing or third-party presets required | Built-in fade-in/fade-out text animations |
| Animation Process | Lengthy with several manual steps | Quick, with a one-click application |
| Customization | Highly customizable with manual editing controls | Offers easy adjustment of text style, alignment, fonts, etc. |
| Presets and Templates | Few built-in templates for fade animations, manual editing needed for more options | Multiple animated text templates with pre-styled fade-in/out variations |
| Performance | Resource-heavy, may lag on basic systems | Lightweight, optimized for smooth performance on most devices |
| Learning Resources Required | Extensive tutorials to master editing | Minimal, most users can use it without extensive guides |
| Timeline | Complex timeline suitable for professional video editors | Clean and straightforward timeline for easy navigation |
| Best For | Professionals, advanced video editors | Content creators, educators, small business users, and beginners |
| Platform Compatibility | Windows and Mac | Windows and Mac |
In the End
The process for Premiere Pro’s text effect, text fading out and in animations involves customizing the built-in effects with keyframing and manual editing controls. This can be time-consuming and inconvenient if you’re not a professional.
But don’t worry! HitPaw Edimakor makes things easier. With its rich library of text animations, you can easily create a fade in or out effect in just clicks, all the while achieving professional results. Give it a try. Download to get started now!
Home > Video Editing Tips > How to Fade Text In/Out in Premiere Pro: Complete Guide with Steps
Leave a Comment
Create your review for HitPaw articles






Yuraq Wambli
Editor-in-Chief
Yuraq Wambli is the Editor-in-Chief of Edimakor, dedicated to the art and science of video editing. With a passion for visual storytelling, Yuraq oversees the creation of high-quality content that offers expert tips, in-depth tutorials, and the latest trends in video production.
(Click to rate this post)