The process to add subtitles with Kdenlive to your YouTube videos is essential for reaching a wider audience and improving accessibility. Kdenlive offers powerful tools to automate this process and allows you to generate subtitles quickly and efficiently. This guide will walk you through the steps to do so.
Part 1: What is Kdenlive
Kdenlive is an open-source video editing program with robust functionality and an easy-to-use interface for both novices and experts. It is a flexible option to add subtitle to video kdenlive as it is perfect for producing top-notch video material for various platforms because it enables multi-track editing, multiple formats, and a wide range of effects and transitions.
Part 2: How to Add Subtitles in Kdenlive
Creating subtitles manually in Kdenlive allows for precise control over timing and accuracy. Here’s a step-by-step guide to help you through the process to add text to Kdenlive.
-
Step 1: Open Kdenlive and Toggle on Subtitles
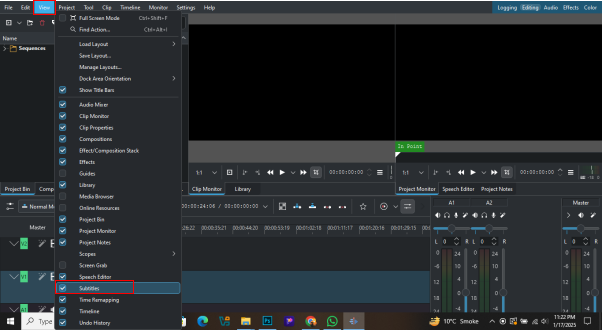
Open Kdenlive on your PC, then select the View tab from the menu bar to activate the subtitles option. To make it simple to access and modify your subtitles while editing, make sure the subtitles panel is accessible.

-
Step 2: Import Your Content and Add to Timeline
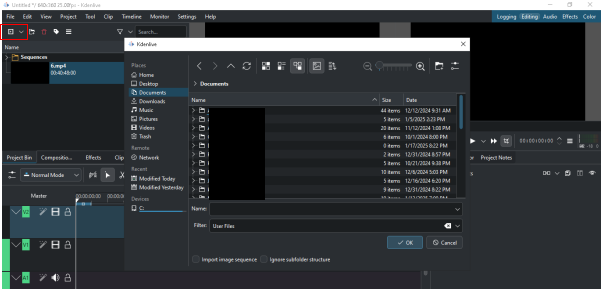
Choose the Add Video Clip button in the interface's upper right corner to import your video content. As an alternative, you can drag and drop your video file straight into the timeline or select Add Clip from the File menu. This will prepare you to create your subtitles.

-
Step 3: Select Add Subtitles
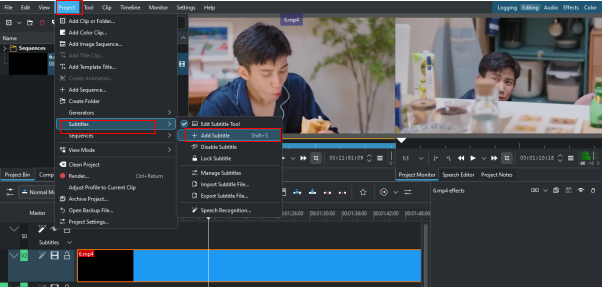
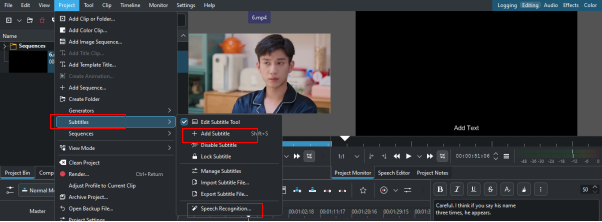
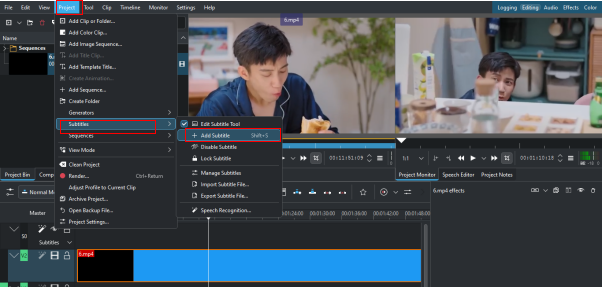
After adding your video to the timeline, pick Subtitles from the Project menu and then Add Subtitles. By doing this, a new subtitle track tailored to your video will be created, giving you more control over your subtitles.

-
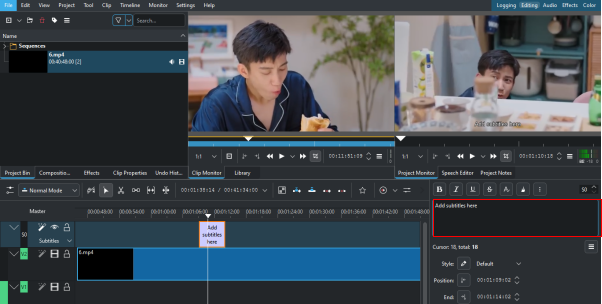
Step 4: Write Subtitles in Text Box
Type your text in the designated text box on the subtitles panel. Make sure each subtitle is positioned and timed precisely to match the conversation in your video by taking your time. Your audience will have a better viewing experience because of this attention to detail.

Part 3: How to Add Auto Captions in Kdenlive
Adding auto captions in Kdenlive can significantly streamline your video editing process. Follow these steps to automatically add auto captions in Kdenlive for your content.
-
Step 1: Open Your Project
Launch Kdenlive and open the project if you want to add auto-captions. Ensure your video clips are already placed on the timeline for processing.

-
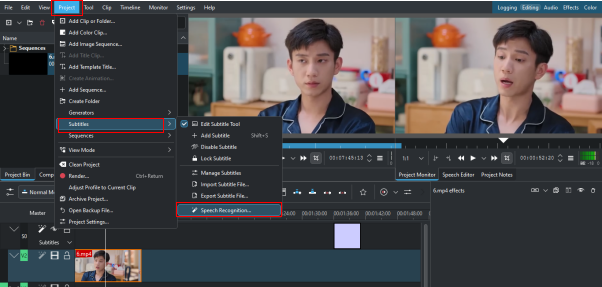
Step 2: Enable Speech Recognition
Navigate to the Speech Recognition tab in the interface. Choose your preferred speech model from the drop-down menu to ensure accurate transcription based on your audio content.

-
Step 3: Start Auto Caption Generation
With your timeline active, click the Start Recognition button. The software will analyze the audio from your timeline and generate captions automatically. Wait for the process to complete, as this may take some time depending on the length of your video.
-
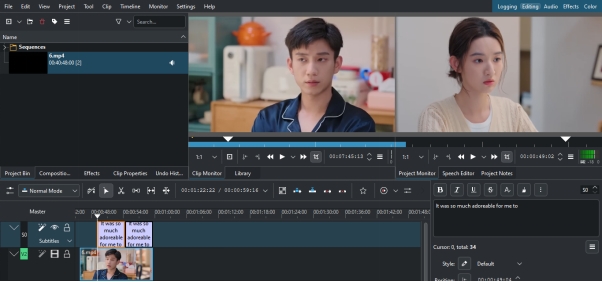
Step 4: Review and Edit Captions
Once the Kdenlive mkv subtitles are generated, they will appear in the speech recognition box. Copy the text and paste it into the Subtitles tool on the right side of the timeline. Review the captions for accuracy, making any necessary adjustments to timing and text to ensure they align with the spoken content in your video.

Part 4: How to Export/Import SRT Subtitles with Kdenlive
Importing and exporting SRT subtitles in Kdenlive is a straightforward process that enhances your video editing workflow. Here’s how to do it in a few easy steps.
-
Step 1: Import the Video and Move it to the Timeline
To begin, import the video you wish to work with into Kdenlive. Make sure your video clip is prepared for editing and subtitle integration by moving it to the timeline after it has been imported.

-
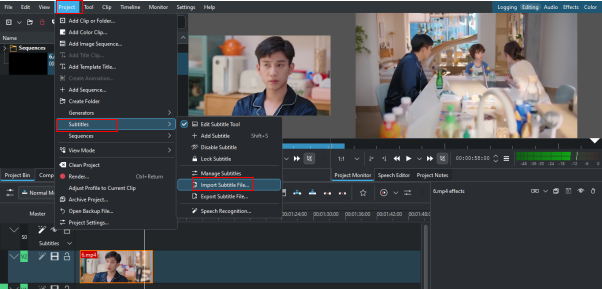
Step 2: Select Import Subtitle File Option
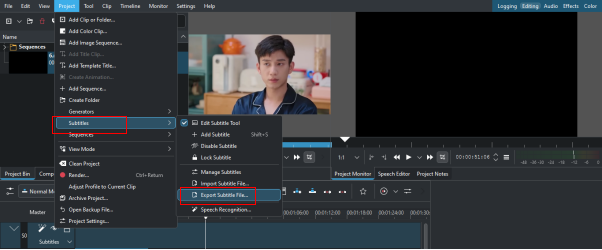
To import srt subtitles with Kdenlive, select the Import File option after selecting Subtitles from the Project menu. By doing this, you may easily incorporate your current SRT subtitle file into the project.

-
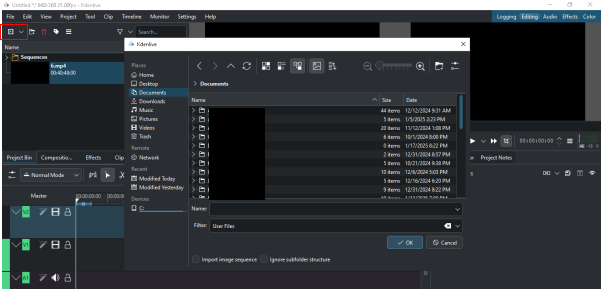
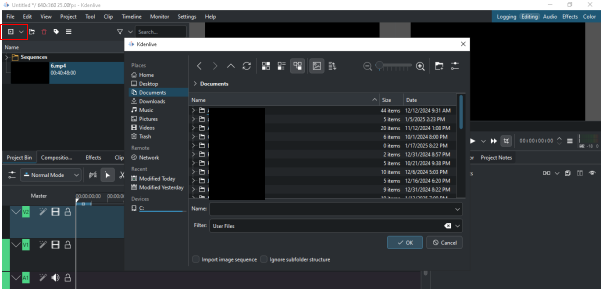
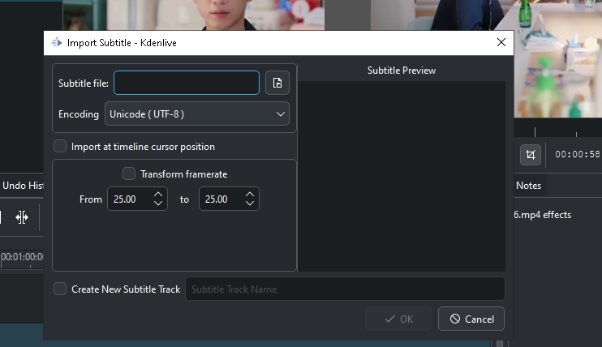
Step 3: Import the Subtitle File
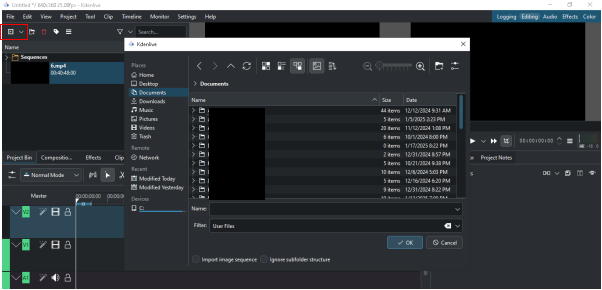
You can search for your SRT file on your computer or type its name into the import dialogue. To fit your video settings, be careful to choose the right encoding technique and adjust the framerate if needed. To import the subtitles into your project after everything is configured, click OK.

-
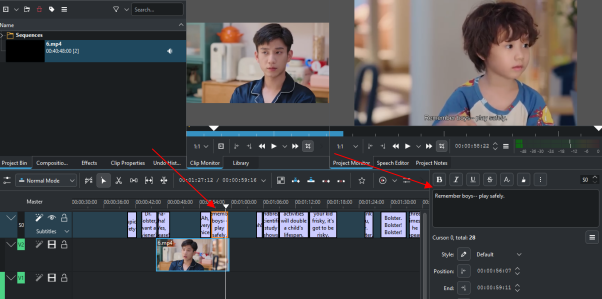
Step 4: Make Changes to the Generated Subtitles
You can use the Subtitles tool to change the subtitles after importing the SRT file. To make sure they properly match the language in your video, take your time and make any necessary adjustments to the timing, text, and positioning. Your audience's entire watching experience will be improved by this meticulous attention to detail.

-
Step 5: Export the Subtitles File
Now it's time to export srt subtitles with Kdenlive. Once you are happy with your subtitles and have made any required changes, pick Subtitles from the Project menu and then click Export File. By doing this, you may easily utilize your updated subtitles in future projects, share them with collaborators, or publish them to video sites by saving them as a new SRT file.

Part 5: How to Change Kdenlive Subtitle Position
Adjusting the position of subtitles in Kdenlive can significantly enhance the visual appeal of your video. Here’s how to change subtitle positions step by step.
-
Step 1: Open Kdenlive and Import your Video
Start by launching Kdenlive on your computer. Import the video you want to edit by selecting Add Video Clip or dragging and dropping your video file into the project bin. Once imported, drag the video clip to the timeline.

-
Step 2: Add Subtitles
You can add subtitles in two ways. First, navigate to the Project menu, select Subtitles, and choose Add Subtitles. Enter your text and adjust the timing accordingly. Secondly, use the Speech Recognition feature to automatically generate subtitles based on your video’s audio.

-
Step 3: Select Change Position Option
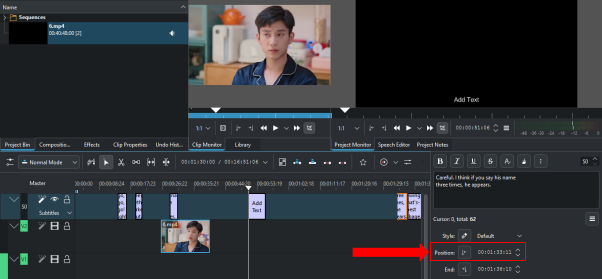
Click on the subtitle track in the timeline to select it. Go to the text section, located in the bottom left of the interface. Click on the three dots icon and select Change Position. A pop-up box will appear. In the pop-up box, type the desired values for Position X and Position Y to move the subtitles to your preferred location on the screen.

Part 6: How to Create Subtitle Animation in Kdenlive
Creating animated subtitles in Kdenlive can add a dynamic touch to your videos, enhancing viewer engagement. Follow these steps to create stunning Subtitle Animations in Kdelive.
-
Step 1: Import Your Video and add Subtitles
Start by launching Kdenlive and importing the video you want to work with. Drag your video clip onto the timeline to set it up for editing. Navigate to the Project menu, select Subtitles, and choose Add Subtitles. In the subtitles panel, enter your text and adjust the timing to match the dialogue in your video.

-
Step 2: Move to Effects and Select Animation
To create animation, select the text clip in the timeline. Go to the Effects panel and search for animation effects such as Fade In, Fade Out, or Slide. Drag and drop your chosen effect onto the text clip.
Part 7: How to Add AI Subtitles without Kdenlive
With a variety of capabilities to improve your video productions, Edimakor is a flexible application for creating subtitles. Edimakor simplifies the process of adding captions to your films with features like text animation, auto subtitles, subtitle translation, and the ability to export subtitle files. With the help of this tutorial, you can add auto-captions to your material without utilizing Kdenlive, making it more readable and interesting.
Steps to Add Subtitles Without Kdenlive:
-
1. Launch Edimakor Subtitle Creator
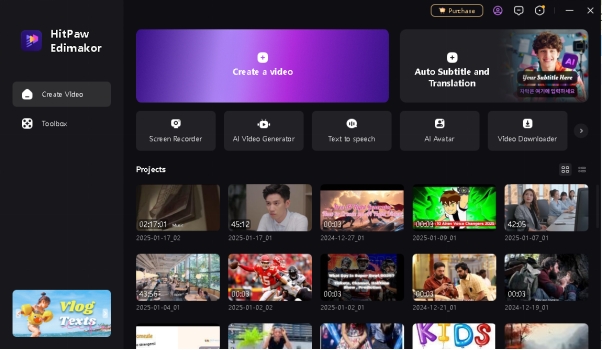
Start by launching the Edimakor software on your PC. For best results, make sure you have the most recent version installed. The application's intuitive interface, which is made for simple navigation, will greet you as it launches. Tap on the Create a Video option and then move to the Media tab to import your content.

-
2. How to Add Subtitles in Edimakor
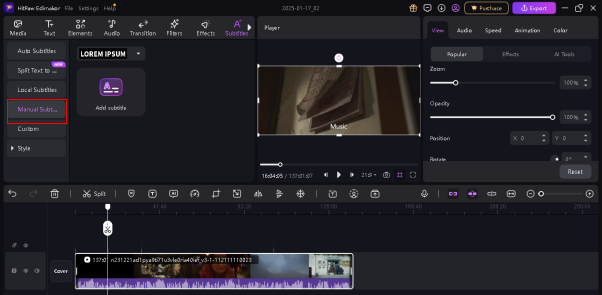
Go to the main menu and select the Subtitles tab. You can control your subtitles with these choices. To add subtitle entries, click Manual Subtitle. You can type the text you want in the text box that appears. For improved viewer comprehension, make sure your subtitles are timed precisely to synchronize with the relevant video elements.

-
3. How to Add Auto Captions in Edimakor
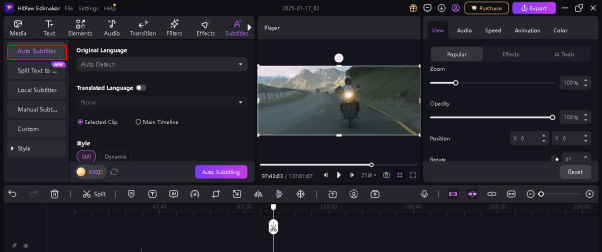
Choose the Auto Subtitle option from the Subtitles tab to make use of the auto caption feature. Choose the original and translated language. As soon as you tap on Auto Subtitling, Edimakor will automatically create captions based on the spoken material after analyzing the audio. You save a great deal of time and work with this option, particularly while watching lengthier videos.

-
4. How to Create Subtitle Animation in Edimakor
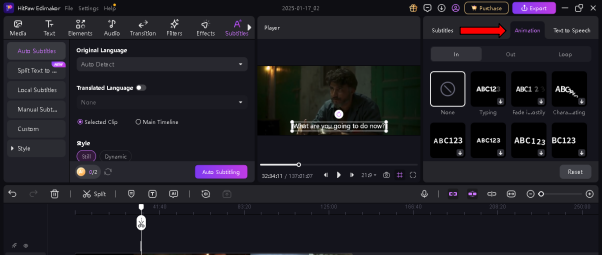
Your videos can become more vibrant with the use of subtitle animations. Choose the precise subtitle text you want to animate to start animating your subtitles. Go to the Animation options at the left of the screen and select from a variety of effects, including bounce, slide, and fade. Try out a variety of animations to determine which one best suits the tone of your film and increases audience interest.

-
5. How to Export/Import SRT Subtitles in Edimakor
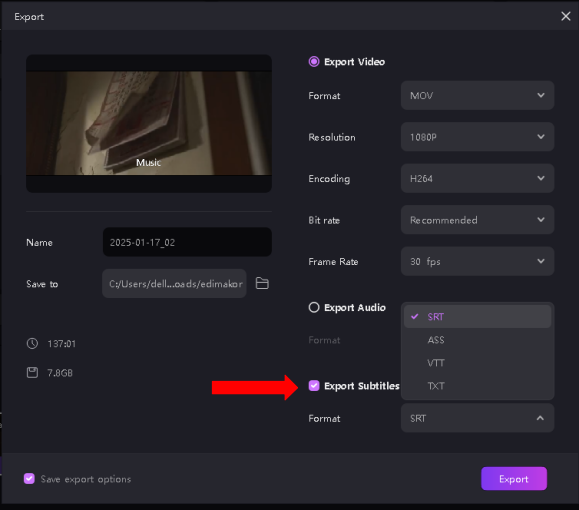
You might want to export your subtitles once you have finished them so you can use them in other projects. Click the Export option and choose the SRT format to accomplish this. You can then save your subtitles as a different file. On the other hand, choose the Import option and upload your SRT file if you already have subtitles in the SRT format that you want to use.

Bottom Lines
The process to add subtitles with Kdenlive to your YouTube videos not only boosts engagement but also makes your content more accessible. By using Kdenlive, you can automate this process seamlessly. For even more subtitle features, you can consider exploring HitPaw Edimakor (Video Editor) as an alternative solution.
HitPaw Edimakor (Video Editor)
- Create effortlessly with our AI-powered video editing suite, no experience needed.
- Add auto subtitles and lifelike voiceovers to videos with our AI.
- Convert scripts to videos with our AI script generator.
- Explore a rich library of effects, stickers, videos, audios, music, images, and sounds.

Home > Video Editing Tips > How to Add Subtitles with Kdenlive for YouTube Automatically
Leave a Comment
Create your review for HitPaw articles




Yuraq Wambli
Editor-in-Chief
Yuraq Wambli is the Editor-in-Chief of Edimakor, dedicated to the art and science of video editing. With a passion for visual storytelling, Yuraq oversees the creation of high-quality content that offers expert tips, in-depth tutorials, and the latest trends in video production.
(Click to rate this post)