By 2025, ComfyUI has become a prominent AI-powered video creation platform that enables producers to turn text prompts into dynamic videos. ComfyUI text to video is a flexible option for both novices and experts due to its modular architecture and compatibility with other models.
Part 1: What Is ComfyUI Text to Video?
With the help of ComfyUI Text to Video , a state-of-the-art node-based interface based on Stable Diffusion, users may create AI-powered videos using straightforward text prompts. With the help of models like AnimateDiff, Flux, and SDXL, it allows artists to create unique workflows that convert written descriptions into dynamic visual information.
In contrast to conventional editors, ComfyUI provides modular flexibility, allowing users to take charge of any stage of the video production process. This application offers strong capabilities for both novice and expert users in the field of generative media and video synthesis, whether you are making brief animations, looping clips, or working with AI images.
Part 2: ComfyUI Text to Video Tutorial | Step by Step
Setting things up correctly is essential before beginning the generation process. Every step is necessary to guarantee a seamless workflow, from installing ComfyUI to downloading ComfyUI Best Text to Video model.
-
Step 1: Install ComfyUI
Installing 7-Zip first is necessary in order to extract the compressed file for ComfyUI. Download the ComfyUI standalone version after installation, then use 7-Zip to unzip the.7z file. A folder called ComfyUI_windows_portable will be provided to you. Put a checkpoint model, such as DreamShaper 8, into the checkpoints folder after downloading it. Now, use run_cpu.bat to launch ComfyUI.

-
Step 2: Get the Video Model, Text Encoders, and VAE
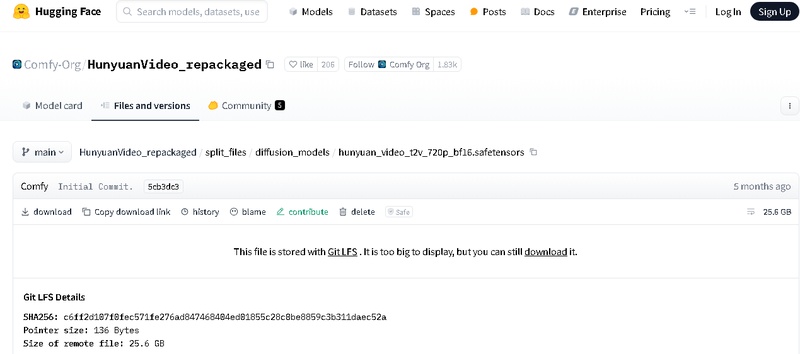
Download the Hunyuan ComfyUI Text to Video model and put it in the diffusion_models folder to activate text-to-video generation. Now, for text encoding, you have to download llava_llama3_fp8_scaled.safetensors and clip_l.safetensors files. Once, you have added hunyuan_video_vae_bf16.safetensors in the VAE directory, restart the ComfyUI.
-
Step 3: Revise Prompt
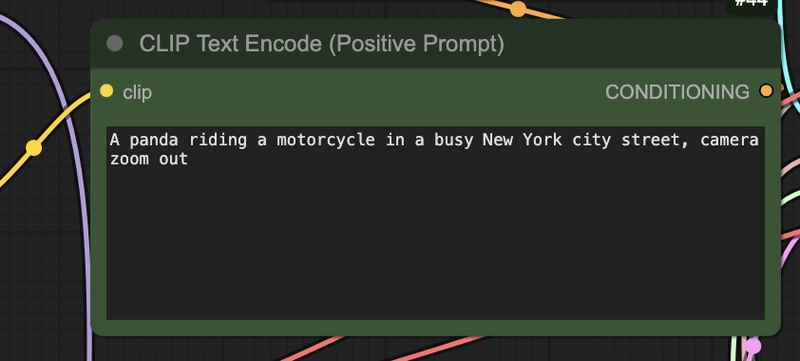
It is time to improve your input prompt now that your setup is complete. Be imaginative, specific, and descriptive because the prompt outlines what you are expected to produce. Make sure your text is optimized for the kind of graphics you want to create by adjusting the prompt settings in ComfyUI Text to Video Workflow interface.

-
Step 4: Generate Video
After you have finished configuring your model and prompt, just click the Queue button in the ComfyUI interface. Your input will be processed by the AI, which will then start producing the film. This could take a few seconds, depending on your hardware and prompt complexity, so wait patiently for the finished product. This is the easiest ComfyUI Text to Video Tutorial you will ever found.
-
How to Get the Best Results of ComfyUI Text to Video?
ComfyUI image and text to video requires a clever mix of high-quality models, optimal prompts, and fine-tuned settings to produce the best results.
Use High-Quality Checkpoints and Video Models
Start by downloading high-quality models like as Animatediff, Flux, or Hunyuan Video. These have received specialized training for realistic motion and seamless transitions. As basis checkpoints, models such as DreamShaper, Realistic Vision, or SDXL are also effective.
Write Detailed, Clear Prompts
Having prompts is crucial. Be specific but descriptive. If you want styled results, add keywords like slow motion, cinematic lighting, or hyper-realistic. You can even incorporate that style into the prompt if you want silly or anime-like outcomes.
Optimize Workflow Parameters
Set a stable seed value for reproducibility and pick an appropriate frame count, usually between 16 and 60 for short clips. To influence the movement and tone of your video, use the node editor's motion scale, camera path control, and prompt conditioning strength capabilities.
Preview Before Final Export
Before executing the entire queue, always test your configuration with 4–8 frames. This aids in identifying any problems with rendering, motion, or composition early on. Rerun with full frame settings if you are happy.
HitPaw Edimakor (Video Editor)
- Create effortlessly with our AI-powered video editing suite, no experience needed.
- Add auto subtitles and lifelike voiceovers to videos with our AI.
- Convert scripts to videos with our AI script generator.
- Explore a rich library of effects, stickers, videos, audios, music, images, and sounds.
Part 3: How to Turn Image to Video in ComfyUI
If you want to bring your static images to life, ComfyUI makes it easier than you think.nA few nodes and models, boom, it’s animated. You don’t need to be a video editor, all it takes is some creative input.
-
Step 1: Install ComfyUI
Installing 7-Zip is the first step in extracting the zipped files from ComfyUI. Next, download and use 7-Zip to extract the ComfyUI standalone version. Inside the checkpoints folder, place a checkpoint model. Finally, use run_cpu.bat to launch ComfyUI.
-
Step 2: Install Custom Nodes
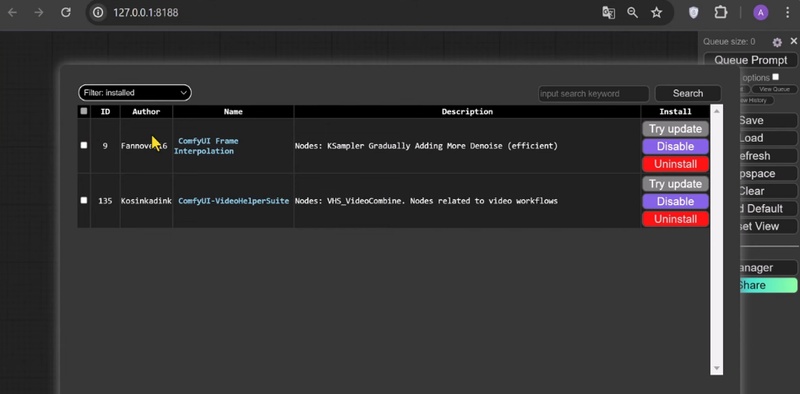
Install the two necessary custom node suites, ComfyUI-VideoHelperSuite and ComfyUI-Frame-Interpolation. These enhance your workspace with robust video editing, interpolation, and utility tools. Before restarting ComfyUI, locate their GitHub repos and install them by following the directions in the custom_nodes directory.

-
Step 3: Get SVD Img2Vid Model
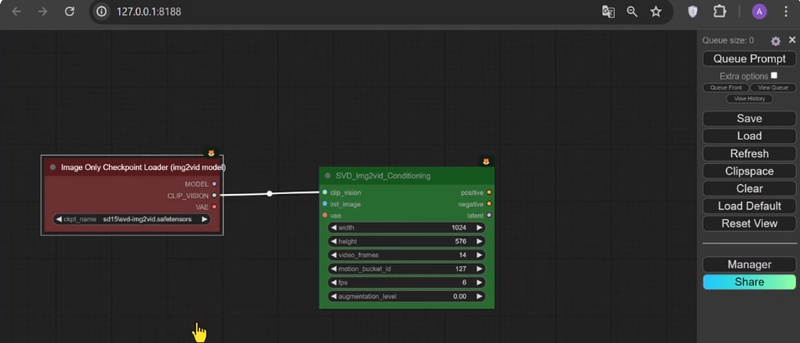
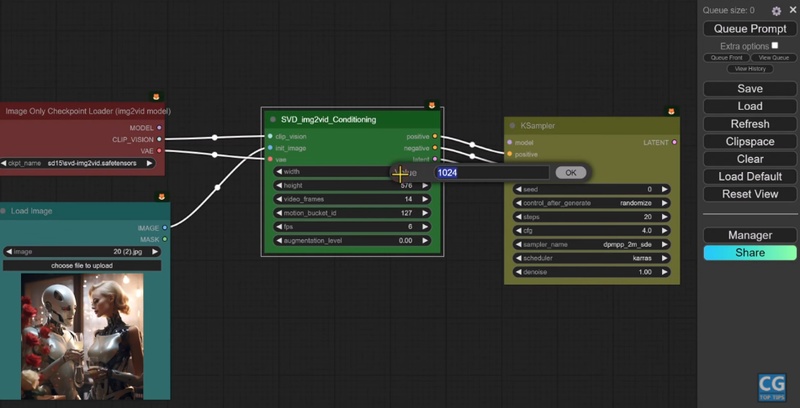
Save the SVD Img2Vid.safetensors model to the ComfyUI/models/checkpoints folder after downloading it. Search on its name to open it in ComfyUI, then select Clip Vision. To load and prepare the image input, add the ImageOnlyCheckpointLoader node.

-
Step 4: Open KSampler
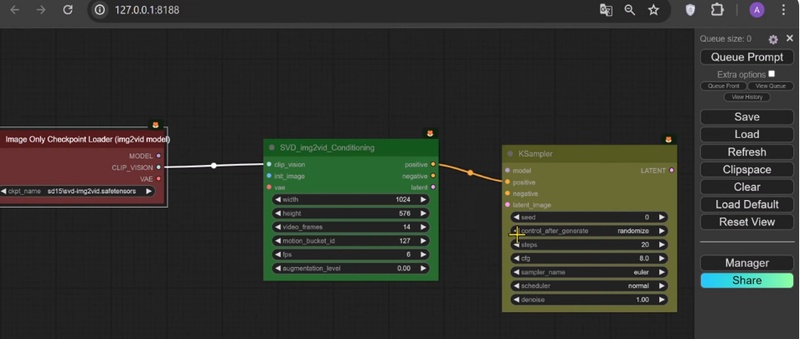
Find the Positive input section next to the Clip Vision button after your model has loaded. Locate the KSampler node and open it. Set important parameters here, such the sampler type and CFG scale, which will determine how the image is altered throughout generation.

-
Step 5: Load Image
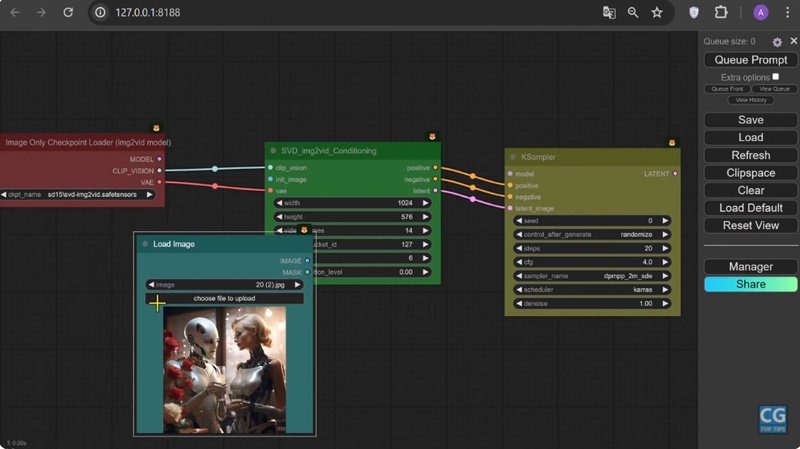
Locate and pick the Init_Image input under the model node. Select LoadImage from the list of available options, then import the static image you wish to animate. The nodes you join will process this image, which serves as your base input for creating videos.

-
Step 6: Select the Preferences
Change parameters like width, height, frame count, FPS, and augmentation level to personalize your video output. The resolution and motion flow of your finished video will be influenced by these settings. Higher FPS produces smoother, more organic movement, whereas lower FPS produces slower animations.

-
Step 7: Connect Models
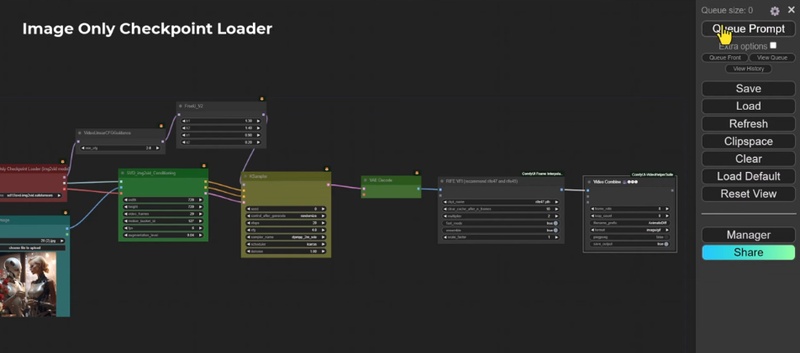
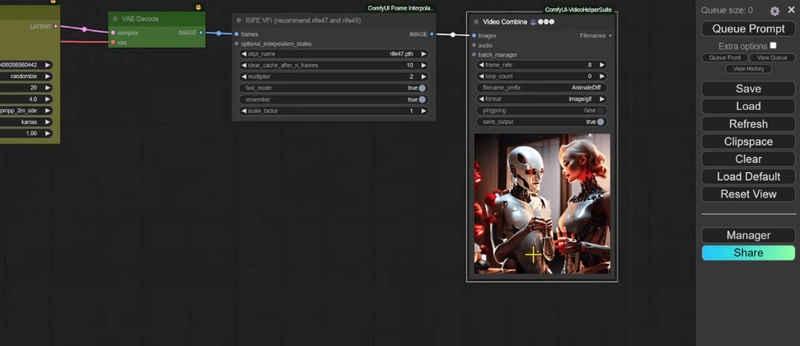
Connect to VideoLinearCFGGuidance by selecting the Model field in ImageOnlyCheckpointLoader. Then, for higher-quality images, link it to FreeU_V2. Choose LATENT in KSampler, then add VAE Decode. Lastly, connect it to Video Combine and RIFE VFI, then click QUEUE to start the creation process.

-
Step 8: Save the Video
After the video generation process is finished, the output directory will contain the final product. If necessary, you can preview it or make additional edits. Smooth motion and clear frames are guaranteed by the usage of RIFE VFI, FreeU, and Video Combine, making them ideal for sharing or advancing artistic endeavors.

Part 4: Stable Diffusion vs ComfyUI vs Edimakor Text to Video
Now, let us compare Stable Diffusion, ComfyUI, and Edimakor Text to Video to see which is more powerful and valuable.
Stable Diffusion vs ComfyUI vs EdimakorText to Video
We're diving into a friendly comparison: Stable Diffusion vs. ComfyUI vs. Edimakor Text to Video – let's see which one's your jam!
| Name | Pricing | Ease of Use | All-in-One Video Toolkit | Duration | Quality |
|---|---|---|---|---|---|
| Stable Diffusion | Free | Moderate | Up to 2–4 sec | High | |
| ComfyUI | Free | Complex | Custom | Very High | |
| Edimakor | Paid (Free Trial Available) | Very easy | Up to 60 sec or more | Very High |
Video Tutorial of Edimakor Text to Video:
Learn how to easily create stunning videos from text using Edimakor's powerful AI Text to Video feature. Watch our full video tutorial now!
5 More ComfyUI Text to Video Alternatives
Here are 5 most recommended alternatives to text to video AI ComfyUI, along with their key specifications:
| Name | Pricing | Ease of Use | All-in-One Video Toolkit | Duration | Quality |
|---|---|---|---|---|---|
| Runway ML | Freemium($12/mo) | Very easy | Up to 4 sec(free) | High | |
| Pika Labs | Free | Easy | Partial | 3–5 sec(free) | High |
| Synthesia | Paid ($22/mo) | Very easy | Up to 10 min | Professional-grade | |
| Kaiber AI | Freemium($5/mo) | Easy | Up to 5 min | High | |
| DeepBrain AI | Paid(custom) | Moderate | Long-form supported | Broadcastquality |
Conclusion
ComfyUI Text to Video stands out as a strong and incredibly adaptable solution for professionals and enthusiasts who create videos. It is perfect for customers who want fine-grained control over their workflows because of its modular interface and integration features. HitPaw Edimakor (Video Editor) stands out as a strong ComfyUI substitute for people who want ease of use and a more seamless onboarding process. It blends a strong feature set with an easy-to-use interface.
HitPaw Edimakor (Video Editor)
- Create effortlessly with our AI-powered video editing suite, no experience needed.
- Add auto subtitles and lifelike voiceovers to videos with our AI.
- Convert scripts to videos with our AI script generator.
- Explore a rich library of effects, stickers, videos, audios, music, images, and sounds.

Home > AI Video Tools > Full Guide: How to Use ComfyUI Text to Video 2026
Leave a Comment
Create your review for HitPaw articles






Yuraq Wambli
Editor-in-Chief
Yuraq Wambli is the Editor-in-Chief of Edimakor, dedicated to the art and science of video editing. With a passion for visual storytelling, Yuraq oversees the creation of high-quality content that offers expert tips, in-depth tutorials, and the latest trends in video production.
(Click to rate this post)