No matter how careful you are with your camera settings, sometimes your footage just doesn't turn out as clean as you hoped. Maybe it was a low-light shoot, or maybe the file compression added a bit of unwanted grain. Either way, that noisy, speckled look can take the polish off an otherwise solid video.
The good news? If you're editing in Adobe Premiere Pro or After Effects, some pretty handy tools are built to help you fix it. And if those aren't cutting it, there are also some smart plugins and alternatives worth checking out.
In this guide, we'll walk through the most effective ways for AI Denoise for video Adobe. So, let's get started!
Part 1: Does Adobe Have Video DeNoise?
Yes, Adobe does have video denoising tools, but they're not front and center, and honestly, knowing which one to use really depends on how you like to work.

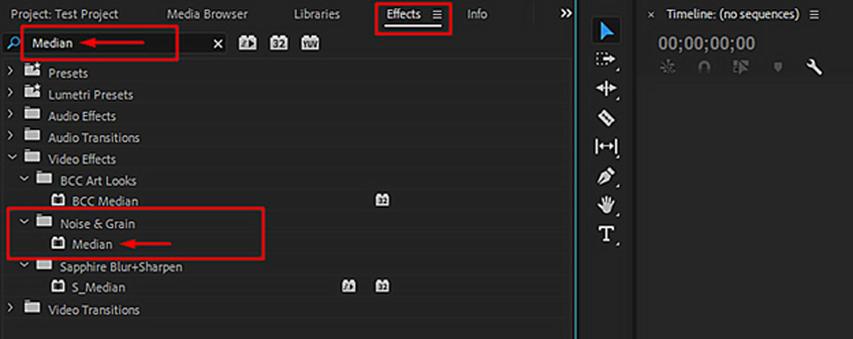
In Premiere Pro, one of the go-to effects is Median. It's tucked under the Obsolete effects folder (yeah, not the most reassuring label), but it still works. It helps smooth out grainy spots by blending nearby pixels together. It's not fancy, and you'll probably need to tweak it a bit to avoid that overly soft look, but it can clean up light noise decently.
If you're using After Effects, there's even more room to play. You can stack effects, fine-tune with masks, and push things further if you're after that cleaner, sharper finish.
There's also Lumetri Color, which isn't exactly a denoiser, but it can help tone things down if the noise isn't too intense, especially with contrast and shadow tweaks.
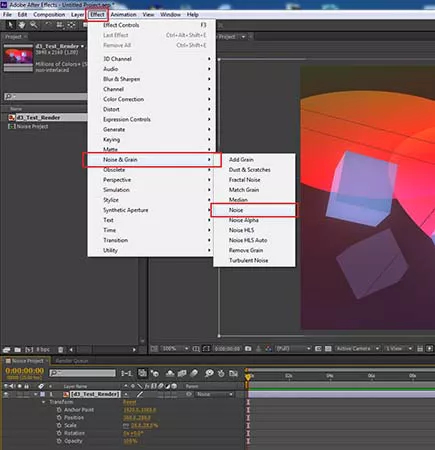
For more control, After Effects steps in with a feature called Remove Grain. It gives you more detailed options and lets you preview how the effect looks on a small portion of your clip before applying it to everything.
So yes, Adobe has denoising tools built in, but they're not magic buttons. They work, but depending on how bad the noise is, you might need a bit of patience… or consider an outside plugin to get exactly what you want.
Part 2: How Do I Reduce Noise in Adobe Video?
Noisy footage? Yeah, it happens, even when you've done everything right. Adobe gives you a few different ways to deal with it. Whether editing in Premiere Pro or jumping into After Effects, you've got some decent tools to clean things up. It just depends on how much control you want and how deep you're willing to go.
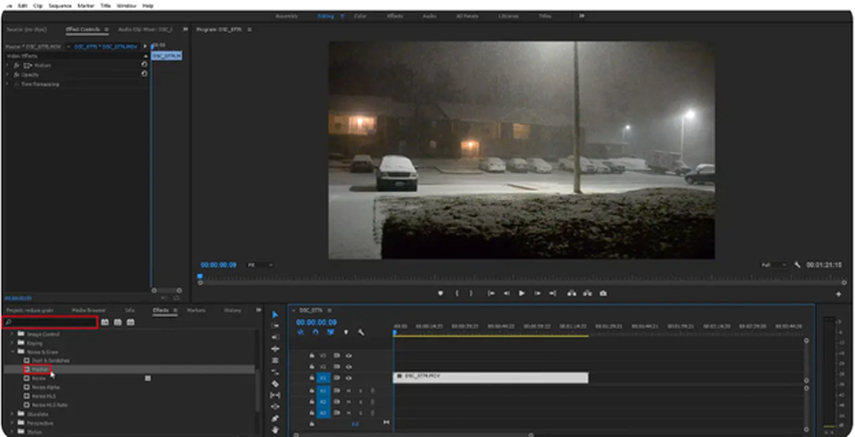
- Import your video clip into the timeline.
- Open the Effects panel and search for Median.

- Drag the Median effect onto your clip. (You can also find it under Video Effects > Obsolete > Median (Legacy).)

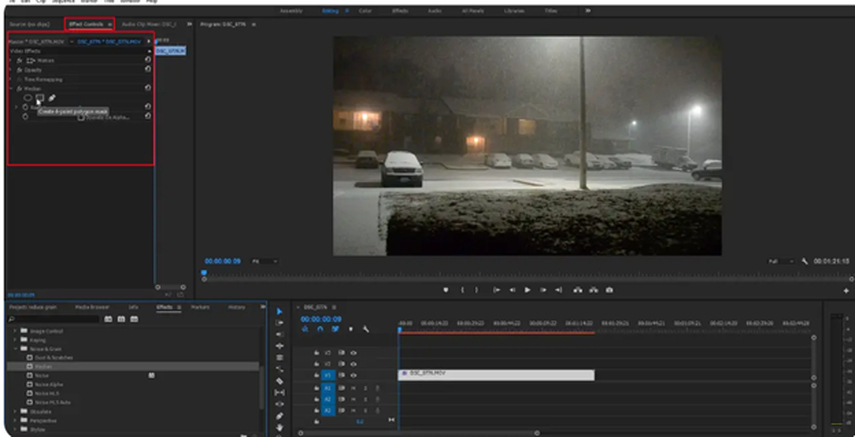
- Go to the Effect Controls panel to find the Median effect settings.
- Adjust the Radius value slowly; start low and increase until the noise is reduced without making the image too blurry.
- Use the Masktool in Effect Controls to apply the effect only to noisy parts of the frame (like shadows or backgrounds) if needed.

- Keep in mind the effect may take longer to process since it's not GPU accelerated, and avoid overdoing it to prevent loss of detail.
- Import your noisy clip into After Effects. You can either work directly inside After Effects or send your Premiere Pro sequence over using Adobe Dynamic Link for a smoother workflow.
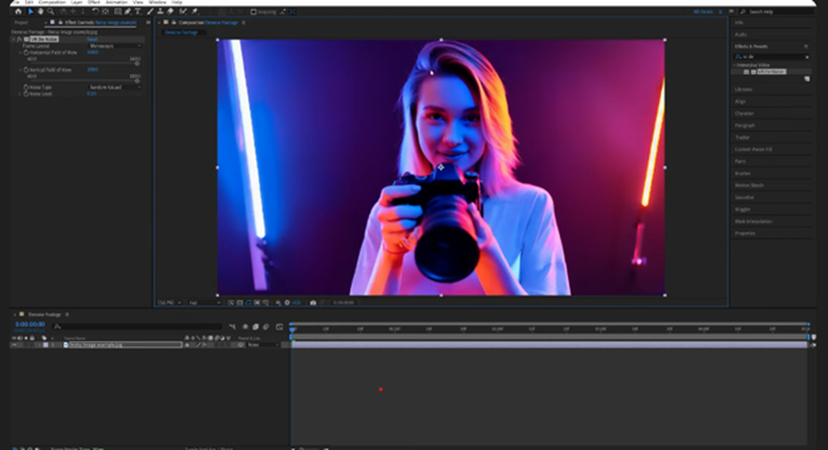
- In the Effects & Presets panel, search for Remove Grain and drag it onto your footage layer.

- Open the Effect Controls panel to start adjusting settings. The key parameter is the View Mode; try Final Result to see the cleaned-up video as you adjust.
- Before applying it to the entire clip, you can preview noise reduction in small sample areas.
- Adjust the Reduction Settings sliders (like Temporal Filtering or Spatial Filtering) to balance noise removal and detail preservation.

- Once satisfied, render the cleaned footage or send it back to Premiere Pro if you're using Dynamic Link.
- Install the ERA 5 Bundle (download from Accusonus).
- Open Premiere Pro and select your audio clip.
- Go to the Effects panel and search for ERA Noise Remover.
- Drag it onto your audio clip.
- In Effect Controls, use the single Reduction knob to remove unwanted noise like static, hum, or background chatter.
- Install iZotope RX Elements (or Advanced). Restart Premiere Pro after installation.
- Select your audio clip and open the Effects panel. Search for RX Voice De-noise under Audio Effects and drag the effect onto the clip.
- In Effect Controls, choose Adaptive mode for automatic noise profiling, or Manual mode if you want to learn a noise profile.
- Adjust the Threshold and Reduction sliders to clean the audio while maintaining clarity.
1. Denoise Video in Premiere Pro with Media Effect
The Median effect in Premiere Pro is a straightforward way to tackle video noise by smoothing out grainy areas. It works by looking at each pixel and replacing its color with the surrounding pixels' middle (or median) value. This blending helps hide unwanted noise, making your footage look cleaner.
2. Denoise Video in Premiere Pro with Adobe After Effects
If you want more precise control over noise reduction, After Effects is the best video denoiser, especially for footage that needs a deeper cleanup. After Effects includes a built-in effect called Remove Grain, specifically designed to reduce video noise without overly blurring your image.
3. Use Audio Noise Reduction Plugins for Premiere Pro
When you're cleaning up video, don’t forget about audio; background hums, hisses, or ambient chatter can make even polished visuals feel amateurish. Since Premiere Pro no longer offers advanced built-in audio denoising, third-party plugins are the way to go if you want professional-sounding audio without switching to Adobe Audition.
Here are two reliable plugins you can use in Premiere Pro to clean up audio:
3.1 Accusonus ERA 5 Noise Remover
Accusonus ERA Noise Remover is part of the ERA 5 Bundle and is incredibly beginner-friendly. It’s designed for fast audio cleanup, just one knob controls how much noise reduction you apply.
3.2 iZotope RX Voice De-noise
This is a professional-grade tool from iZotope's RX suite, especially good for cleaning up voice tracks in noisy environments (e.g., interviews, podcasts, YouTube audio).
Part 3: Pros and Cons of Premiere Pro Noise Reduction
Let's have a look at some pros and cons of AI denoise for video Adobe:
Pros
- Built-in and ready to use: There's no need to buy extra plugins or software; it's right there inside Premiere Pro.
- Simple to apply: Effects like Median for video and Denoiser for audio are easy to add and tweak.
- Good for quick fixes: Great when you need to reduce light noise or grain without spending too much time.
- Integrates smoothly: Works seamlessly with your existing Premiere Pro projects and timeline.
Cons
- Limited power: Built-in tools aren't as advanced as specialized third-party noise reduction plugins.
- Can blur details: Video effects like Median might soften your footage too much if pushed too far.
- Processing speed: Some effects (like Median) aren't GPU-accelerated, so they can slow down your editing workflow.
- Audio noise reduction basics: The built-in audio denoiser may struggle with complex background noise or require fine-tuning to avoid sounding unnatural.
Part 4: Best Alternatives to Premiere Pro Video Denoisers
Premiere Pro's noise reduction tools can work, but they're not always the easiest or most effective. If you're after cleaner results, less manual tweaking, or just a faster workflow, there are some solid alternatives worth checking out. Here are some alternatives.
- Use advanced AI technology to denoise video and audio files in 1 click.
- Remove various noise types such as wind, hum, hiss, reverb, etc.
- Adjust audio volume and set fade in or fade out effects.
- Remove background noise with high quality and efficiency.
- Set audio speed while keeping the tone.
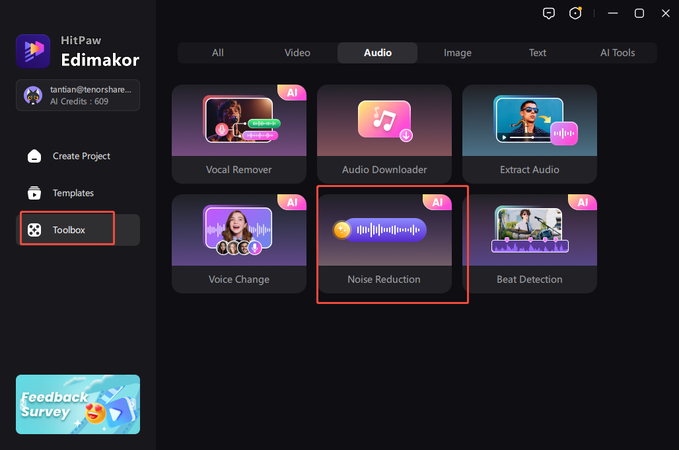
Download and install HitPaw Edimakor. Launch the noise reduction tool and go to Noise Reduction from Toolbox.

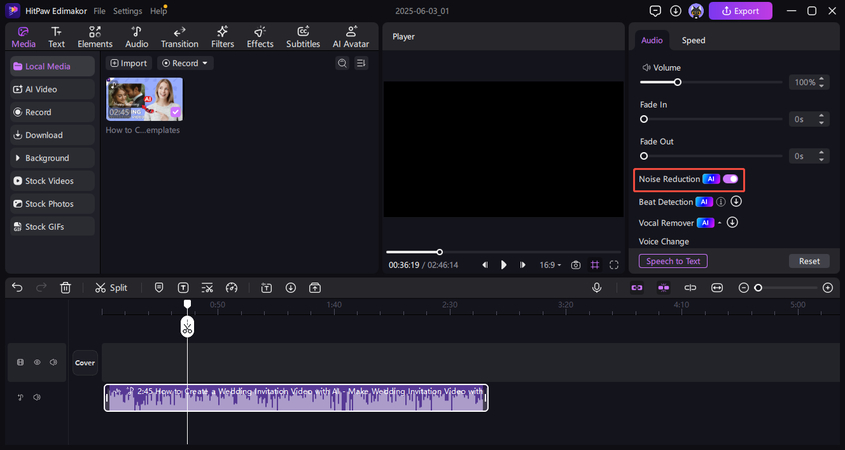
Import your audio or video files and then turn on Noise Reduction button. The tool will automatically remove all background noise quickly.

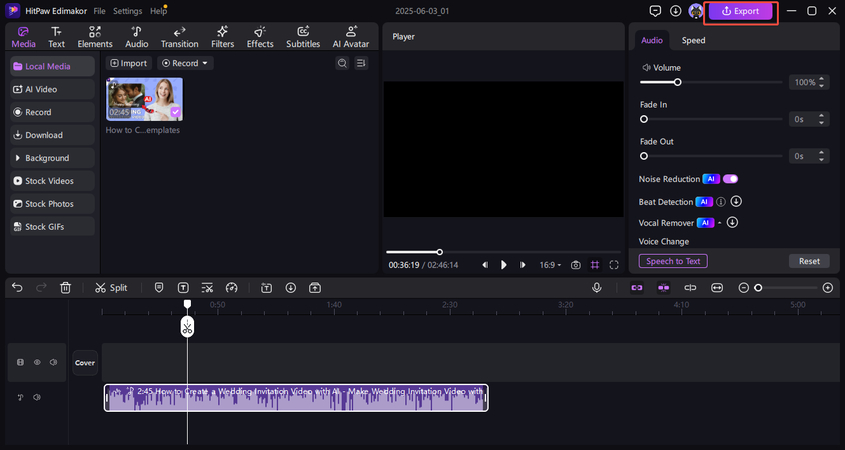
When Edimakor reduced noise for your files, you can click the Export button to download the file for further need.

1. HitPawEdimakor
HitPaw Edimakor is super straightforward and designed with users in mind who want quick, no-fuss noise reduction. It's great if you're not super deep into editing but still want your footage looking clean and smooth. The interface is pretty friendly, no complicated menus or confusing options. Just drop your video in, tweak a couple of settings, and let it do its thing. It's fast and perfect for when you're on a deadline or just want a hassle-free fix.
Edimakor -- Best Video Denoiser with AI
How to denoise video with Edimakor AI:
2. Veed.iO
Veed.iO is an online video editor with a solid noise reduction feature. It's convenient because you don't need to install anything, just upload your video, apply noise reduction, and download the improved version. Great for quick fixes and projects on the go.
3. AVCLabs Video Enhancer AI
AVCLabs uses AI to clean up your footage, and it actually does a pretty solid job. It doesn't just blur out the noise, it's smart enough to keep the important details sharp while removing all the grain. If you're after high-quality results and don't mind waiting a little longer for it to process, this one's worth a shot. Compared to the usual manual methods, the AI does much of the heavy lifting for you, and the final result usually looks much cleaner.
Conclusion
Grainy video and scratchy audio? Yeah, no one wants that, but it happens. Luckily, Adobe Premiere Pro and After Effects have some pretty useful tools to help clean things up, especially if you're working on casual projects or just getting started. They might take a little tweaking, but they can definitely help you smooth things out.
That said, if you're looking for something a bit more straightforward or just want results faster, tools like HitPaw Edimakor, Veed.io, and AVCLabs are solid alternatives. They're easier to use, often powered by AI, and honestly, they can save you a lot of time.
It's all about what works best for you. Play around, test a few things out, and go with the option that fits your workflow. Clean, sharp video makes a big difference, and your viewers will notice.
HitPaw Edimakor (Video Editor)
- Edit video audio easily with fee noise reduction function.
- Extract audio from video with ease and export without any hassle.
- Remove vocal from video for pure music audio recording or downloading.
- Convert text to speech or vice versa and change the voice with numerous options.

Home > AI Video Tools > How to Denoise Video in Adobe Premiere Pro and After Effects
Leave a Comment
Create your review for HitPaw articles




Yuraq Wambli
Editor-in-Chief
Yuraq Wambli is the Editor-in-Chief of Edimakor, dedicated to the art and science of video editing. With a passion for visual storytelling, Yuraq oversees the creation of high-quality content that offers expert tips, in-depth tutorials, and the latest trends in video production.
(Click to rate this post)